Setting Builds as Keep
You can mark successful builds as “keep.” You might do this to avoid accidentally deleting it, perhaps with the intention of rolling back to it at some point (i.e., setting the site associated with that build to “live”).
[Menu Proxy — Headings — Online — Depth3 ]
Permission Required?
For this activity, you must have the following permission setting:

For more information about permissions, see Setting User Permissions or Setting Team Permissions.
How to Set a Build as Keep
- Select Projects on the left side of the interface, then click a project name to open it.
- At the top of the page, click Builds.
- In the grid, click the three dots to the left of the build that you want to set to “keep.”
- From the menu select Toggle Keep.
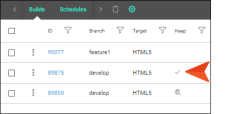
-
In the confirmation dialog, click OK. An icon is shown next to the build.

What’s Noteworthy?
Note To remove the “keep” status of a build, select the Toggle Keep option again.
Note You can also set a build to "keep" from the Build Profile dialog. See Opening the Build Profile Dialog.

