Inviting Users
Administrators can invite individuals to join the MadCap Central license via email. Users can be invited one at a time, or many can be added in bulk. When inviting authors, you can also set permissions for the tasks they are allowed to perform.
Following are the types of users you can invite:
- Author An author is an individual who works in Flare projects, creating and editing content. This person can also be the "owner" of a review when they send topics and snippets that need to be reviewed by others
- Subject Matter Expert A subject matter expert (SME) is an individual whose main purpose in Central is to review topics and/or snippets sent by an author. Therefore, a SME only sees the parts of the Central user interface that are necessary for reviews.
- Viewer A viewer is an individual whose only role is to view live private output. These users do not even need to belong to your company. However, they must set up a Central password; not to access Central itself, but to see live private outputs with which they are associated. Viewers can also see live output that is not set as private, just as anyone in the general public can. So if you do not need private output, you do not need to invite viewers to the license.
Note If your license is enabled for single sign-on (SSO) and you have private output, you can automate the process for inviting users (as viewers), as well as associating users and sites with a team. In the license settings, you can use an option to create viewer users on demand, and choose one or more teams to associate with that process. By simply providing new users with the link to the private output, they will be onboarded with the viewer seat type and added to the team(s) you designate.
[Menu Proxy — Headings — Online — Depth3 ]
Permission Required?
For this activity, you must have the following permission setting:

For more information about permissions, see Setting User Permissions or Setting Team Permissions.
How to Invite a Single User
- If you plan to invite viewers:
- Make sure you have created at least one team that will be associated with the live private site.
- Make sure you have created a site, setting it as live and private, and associating the appropriate team(s) with it.
- On the left side of the interface, click Users.
- In the toolbar click
 .
. -
On the first page of the wizard, make note of how many seats of each user type are available to you. If you require more, you can click the link on the page to purchase more seats.
Alternatively, you can deactivate an existing user to free up a user seat.
- At the bottom select Add One User.
- From the User Seat Type field, select the kind of user you want to invite.
- Complete the First Name, Last Name, and Email fields. Then Click Next.
-
If you selected the author seat type, choose the permissions that you want to give the new user. Then click Next.
Note You cannot set permissions for SMEs or viewers.
- You can associate new users with one or more teams. In order to see live private output, users must be part of a team that is also associated with that site. An icon
 is shown next to any team that is associated with a live private site. If inviting viewers, you must select at least one team displaying that icon. Then click Next.
 - If you selected the viewer seat type, from the Onboarding Site drop-down, choose the default live private site. Even though viewers might be associated with multiple live private sites, when they first click the link in their invitation email to set up a username and password, they are automatically logged in to the site you choose in this wizard. After selecting a site from this drop-down, click Next.
- Click Send Invite. If the invitation is successful, an email is sent to the user. The user must click the link in the email to activate the account. Until users activate the account, they are listed as "Invited" in the system (on the Users page).
- On the progress page, you can click Close while the invitation is being sent.
How to Invite Multiple Users in Bulk
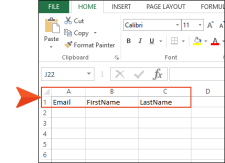
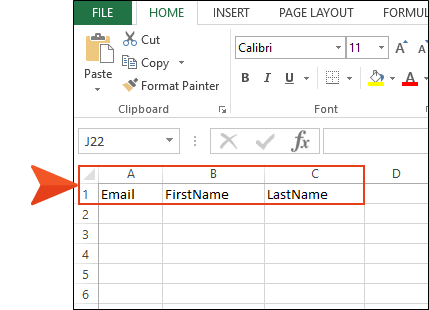
To use the bulk invitation process, you first need to create or have access to a comma-separated value (CSV) file containing the information for the users you want to add. The CSV file should have three columns, with the following in the top cells of each column:
- FirstName
- LastName
If you do not yet have such a file, you can download a template from Central, as described in the steps below.
Note You can have no more than 1,000 user rows per CSV file. So for example, if you need to send out invitations to 4,813 users, it's best to put those users into five separate CSV files, and go through the invite process in Central five separate times (one for each file).
- If you plan to invite viewers:
- Make sure you have created at least one team that will be associated with the live private site.
- Make sure you have created a site, setting it as live and private, and associating the appropriate team(s) with it.
- On the left side of the interface, click Users.
- In the toolbar click .
-
On the first page of the wizard, make note of how many seats of each user type are available to you. If you require more, you can click the link on the page to purchase more seats.
Alternatively, you can deactivate an existing user to free up a user seat.
- At the bottom select Add Many Users.
- From the User Seat Type field, select the kind of user you want to invite.
-
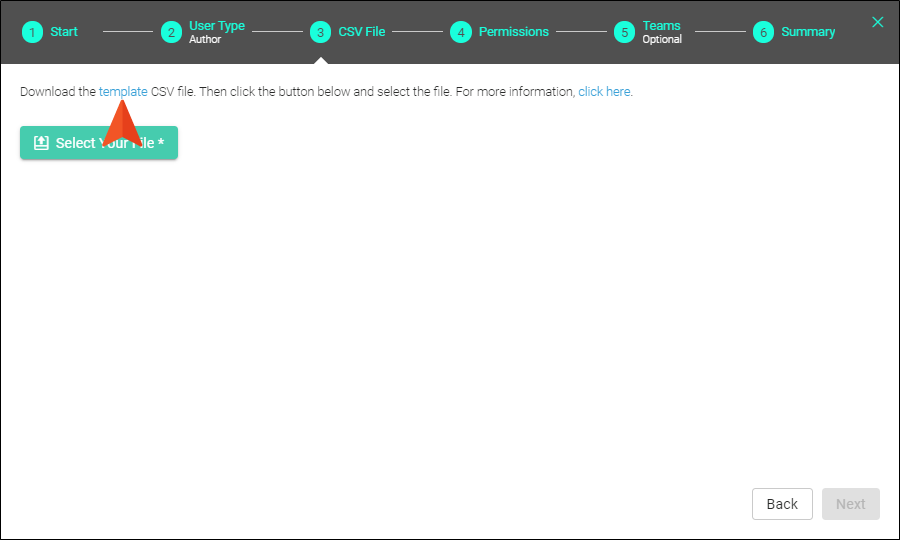
Click Select Your File, and in the dialog that opens, find and select your CSV file. Then click Next.
If you do not yet have a CSV file, you can click the template link on the page.

This template speeds the process because the necessary column headings are already provided.
After you complete the cells with each user’s email and name, save the CSV file, then select it as described at the beginning of this step.
-
If you selected the author seat type, choose the permissions that you want to give the new users. Then click Next.
Note You cannot set permissions for SMEs or viewers.
All of the users in the CSV file will receive the same permissions that you choose. However, you can always edit the permissions for a particular user later.
- You can associate new users with one or more teams. In order to see live private output, users must be part of a team that is also associated with that site. An icon is shown next to any team that is associated with a live private site. If inviting viewers, you must select at least one team displaying that icon. Then click Next.
- If you selected the viewer seat type, from the Onboarding Site drop-down, choose the default live private site. Even though viewers might be associated with multiple live private sites, when they first click the link in their invitation email to set up a username and password, they are automatically logged in to the site you choose in this wizard. After selecting a site from this drop-down, click Next.
- Click Send Invites. If the invitations are successful, an email is sent to each user. The user must click the link in the email to activate the account. Until users activate the account, they are listed as "Invited" in the system (on the Users page).
- On the progress page, you can click Close while the invitations are being sent.
Tip After you send the invitations, the users are created on your Central license. After the users are all created, the emails are then sent out. Keep in mind that this can take awhile, depending on the number of users being created. Also, it is recommended that you wait for one bulk invite process to finish completely before starting another one.

