Tables
Central's
[Menu Proxy — Headings — Online — Depth3 ]
Inserting New Tables
After opening a file, you can insert new tables in it.
How to Insert a Table
-
Open a project, and select the Files tab at the top.
-
On the left, navigate to a topic or snippet file. The file contents display on the right.
-
In the upper-right of the Content Editor, click Edit.
-
In the local toolbar of the
 .
. -
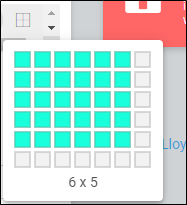
In the drop-down, hover over the squares representing the number of rows and columns that you want, and click.
-
Click in any of the table cells and add content.
Editing Tables
If a table already exists, not only can you can edit the content in it, but you can add or delete rows and columns. You can also delete an entire table.
How to Add Rows and Columns
-
Right-click in a row or column near where you wan to add a new one.
-
In the context menu, select one of the options:
-
Insert Row Above
-
Insert Row Below
-
Insert Column to the Left
-
Insert Column to the Right
-
How to Delete a Row or Column
-
Right-click in a row or column that you want to remove. If you want to delete multiple rows or columns, you can click and drag to select them first, before right-clicking.
-
In the context menu, select Delete Row or Delete Column.
How to Delete a Table
-
Right-click anywhere in the table that you want to remove.
-
In the context menu, select Delete Table.
Copying and Pasting Tables
Formatting for tables is retained when copying and pasting within and between files in Central. Pasting tables from other software (e.g., Word, Outlook) will be inserted as simple tables.
What’s Noteworthy?
Note At this time you can add only regular rows and columns. You cannot add header or footer rows.
