Adding Skins
 Outputs Supported

You can add a skin to your project based on an existing file or on a factory template (i.e., HTML5 Side Navigation and HTML5 Top Navigation).
[Menu Proxy — Headings — Online — Depth3 ]
Permission Required?
Editing content and project files is an activity available to users with the Author status. By default, users with Author status have the following permissions set:
-

If this is deselected, then viewing files in a read-only mode is allowed. On the left side of the page, the Files vertical three-dot menu is not available.
-

If this is deselected, the XHTML in the Code view is read-only.
Editing code is regarded as a capability for an advanced user. If not done properly, the code can become malformed quickly. Administrators can prevent users from editing the code by deselecting the Edit Code permission.
For more information about permissions, see Setting User Permissions or Setting Team Permissions.
How to Add Skins to a Project
Flare Online provides the following ways to add skins to a project.
-
New Project When creating a project from scratch, the New Project Wizard lets you select a source template (e.g., a factory template) from the Template screen.
-
Manually You can add a skin manually to an established project. The source template can be based on an existing file or on a factory template (i.e., HTML5 Side Navigation and HTML5 Top Navigation).
Note There are many source templates, and each serves as a starting point for project configuration. The main skin types supported in the Content view of the workspace are Side and Top Navigation. These formats can provide an HTML5 target and skin that you can subsequently edit.
Note Depending on the source template chosen, you might see various other skin files in your Skins folder. For example, the Top Navigation template also loads skin files such as Home-Searchbar, Topics-menu, and Topics-Searchbar. These are smaller HTML5 skin component files that work with the main skin and corresponding proxies.
How to Manually Add a Skin File
-
Open a project, and select the Workspace tab at the top.
-
From the main toolbar, click
 to add a new file.
Note Alternatively, you can upload an external file into your project.
-
In the Add File dialog, click the File Type drop-down, and select Skin.
-
In the File Path field, enter a path and a name for the new file. The recommended path for skins is Project > Skins.
Alternatively, click
 to select a location for the file in the project, and Accept the file path. Then in the File Path field, enter a name for the file.
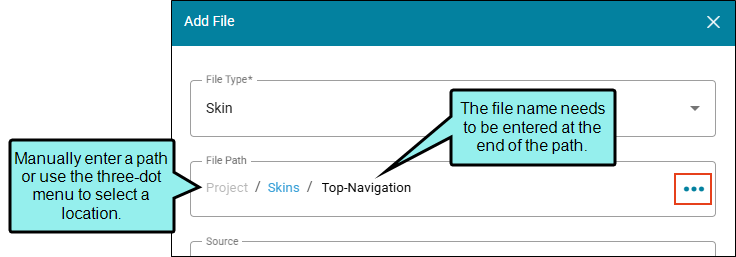
Note You might notice the File Path displays black or blue lettering. The blue items are folders, and you can click the item to jump to that folder.
For example, in the Add File dialog, a file path contains several folders (indicated by blue lettering) before the filename.

If the "Folder1" item is clicked, you know longer see the subfolders.

-
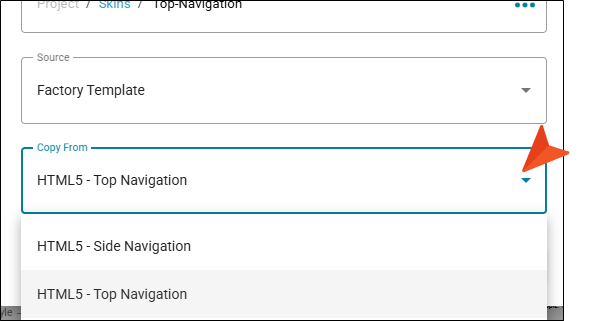
From the Source drop-down, select to create a file based on an existing file or a factory template.
-
Depending on your choice for the Source, the Add File dialog displays one of the following drop-downs below it:
- Existing File From the Copy From drop-down, select an existing file of the same type as a starting point. The new skin file will take on all of the settings contained in the file you select.
-
Factory Template From the Template drop-down, select the format HTML5 - Side Navigation or HTML5 - Top Navigation to use as a starting point. The new skin file will take on all of the settings contained in the template.
-
Click Add. The new skin file is created, and opens in the Content view of the workspace.
-
Click Commit.
-
In the Create New Commit dialog, verify the new file path, and enter a Commit Message.
-
Click Commit. (Or click Cancel, to back out of the process.)