Generating Translated Output
One of the advantages of using Central for your translation needs is that you can easily create single language output (i.e., one target is generated for each language) or multilingual output (i.e., one target is generated for multiple languages). The actual structure of the output does not change, but you can compile multiple languages when you build the output.
[Menu Proxy — Headings — Online — Depth3 ]
Permission Required?
Translation is an activity available to users with the Author status. You must have the following permission setting in Central:
![]()
For more information about permissions, see Setting User Permissions or Setting Team Permissions.
How to Generate Multilingual Output
-
Select Projects on the left side of the interface, then click a project name to open it.
-
At the top of the page, click Builds.
-
In the upper-right, click Create Build. The New Build wizard opens.
-
From the Branch field, you can select the appropriate branch. If you do not select a branch, it defaults to building from the master branch.
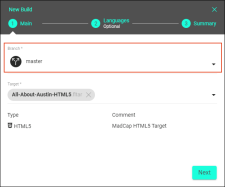
Note You can select any type of branch in the Main screen, meaning that the wizard lets you select a source branch or language branch. However, with multilingual output, it is recommended that you select the source branch first (if you are including it in the output) and then any language branches on the next page of the wizard.
-
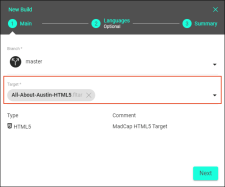
From the Target field, select the target(s) you want to build.
-
Click Next.
-
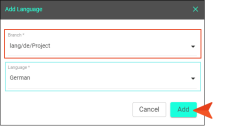
(Optional) For multilingual output, select + Additional Branch.
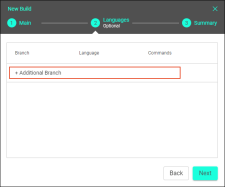
The Add Language dialog opens.
-
From the Branch drop-down, select a branch to add.
Example The Build wizard is flexible as to what branch you select and where. For example, you have a source branch (e.g., master) in your original language and two translated branches (e.g., lang/de/project, and lang/cs/project).
From the Main screen you can select the master branch (most likely, and recommended), and in the Languages dialog you can select the two translated branches. Alternatively, from the Main screen you can select a language branch, and in the Languages dialog you can select the source branch and the other language branch.
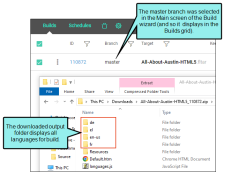
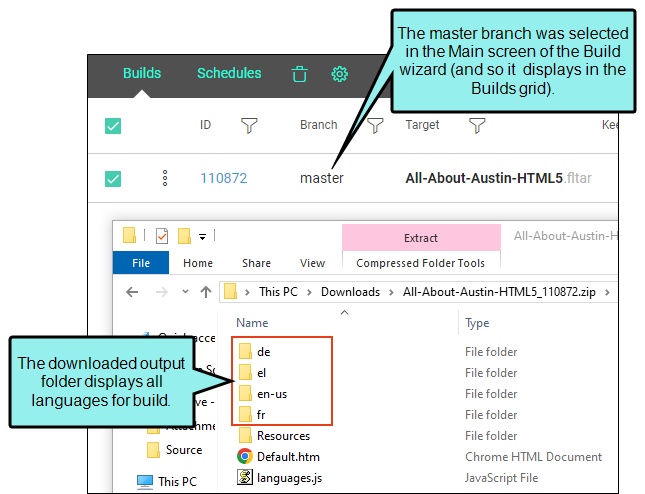
Keep this in mind, when a multilingual build is complete, only one branch displays in the Builds grid, and it is the branch you selected in the Main screen. If you download and view the output folder, it includes all the languages selected.
-
From the Language drop-down, verify or select the correct language.
Example The Language drop-down will most likely auto-populate since it reads the language code from the branch. The exception to this is if you select a source branch (e.g., master) in the Add Language dialog. You would have to select a language.
You can also edit the auto-populated selection. For example, you have a translation branch named lang/es-es/<project> for the Spanish (Spain) dialect. If you download and view the output folder, the language folder is named for the dialect (e.g. es-es).
But you only want the folder to simply read "es" for Spanish. If you update the selection to Spanish, the folder corresponds.
-
Click Add.
Do the above for each language you want to add for the output.

-
-
Click Next.
-
Review a summary of your build options, and click Build. If you need to adjust the options, select Back.
A row is added to the Builds grid.
What’s Noteworthy?
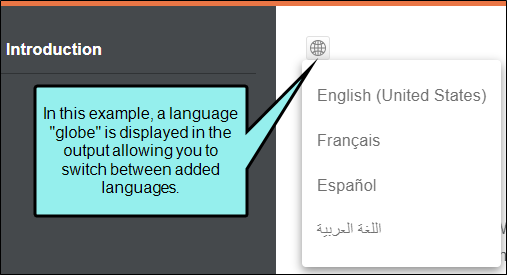
Tip If you used Flare to author the original project, you can edit some files in Flare in order to view multilingual output in a browser (i.e., switch between added languages in HTML5 output manually). This includes adding a Toolbar skin component with a Select Language button, then tying it to a Topic Toolbar proxy in a template page. See Flare's Online Help.
Note You can easily view multilingual output in Windows. From the Build row, select the vertical three-dot menu and click Download. Then, in Windows Explorer, click to open the project's ZIP file. Notice folders for each language compiled for output.
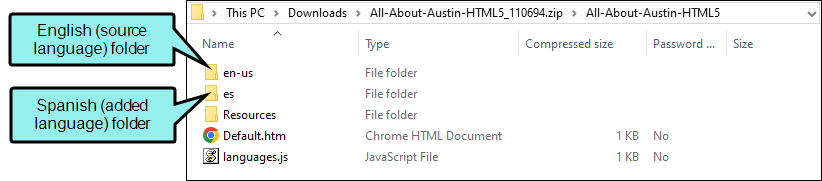
You can link to a target language folder as a way to view the output (e.g., via URL).
Note If you are compiling multilingual output for online (e.g., HTML5) or print-based (e.g., PDF) targets, the order of how languages display online or how they are stitched together in a PDF depends on the order you picked them in the Add Language dialog. You can use the up and down arrows to reorder added languages after the source language.
![]()
For example, a PDF displays the order of languages (specified in the Build wizard).
![]()
If you have configured your project to include a Select Language button in a toolbar for online output, the browser displays the order of languages (specified in the Build wizard).
![]()
Note Central lets you schedule targets to be generated automatically.
Once you have created a build schedule you can edit it. From the Build row, select the vertical three-dot menu and click Edit. The Build Schedule profile opens where you can make changes and Save. You can also delete the schedule.
Note If using Flare 2024 r2 and beyond regarding translation:
If you have existing projects that are already uploaded to Central, you can keep using established multilingual connections (i.e., in the target, linking to other language projects). Central can read existing language projects that were set up using Flare locally. However, if you want to use Flare to manage any new multilingual builds, be aware that there is a linking limitation. Central will not be able to locate the connection that might be established in a multilingual target in Flare. But you can still use Central for hosting, or to manage source files.
If you want to use Central to manage your new translation projects and multilingual builds, then you must set it up and generate builds in Central. Central’s translation feature offers a streamlined interface for adding languages to your project.

