Inserting and Editing Text Hyperlinks


The following steps show you how to insert text hyperlinks into content files, and how to edit existing text hyperlinks.
Note Inserting text hyperlinks is available only for authors, and only in the Content Editor accessed from the project's Files page
Note For more information about text hyperlinks, see Cross-References vs. Hyperlinks. Also, see the Flare online Help.
[Menu Proxy — Headings — Online — Depth3 ]
Permission Required?
Editing content and project files is an activity available to users with the Author status. By default, users with Author status have the following permissions set:
-

If this is deselected, then viewing files in a read-only mode is allowed. On the left side of the page, the Files vertical three-dot menu is not available.
-

If this is deselected, the XHTML in the Code view is read-only.
Editing code is regarded as a capability for an advanced user. If not done properly, the code can become malformed quickly. Administrators can prevent users from editing the code by deselecting the Edit Code permission.
For more information about permissions, see Setting User Permissions or Setting Team Permissions.
How to Insert a Text Hyperlink
-
Open a project, and select the Files tab at the top.
-
On the left, navigate to a topic or snippet file. The file contents display on the right.
-
In the upper-right of the Content Editor, click Edit.
- In the Content Editor highlight the text that you want to turn into a hyperlink.
-
From the Content Editor's local toolbar, click
 .
. -
From the Link To drop-down field, select Topic in Project (for a link to another topic), Place In This Document (for a link to a bookmark, heading, etc. in the same file), or External Link (for a link to a website or external file).
- In the next field, select or type the link's destination.
-
(Optional) In the Text field, you can change or enter the text that is used for the link.
Note This field is disabled if you have selected content that contains XML tags. You should only select plain text.
- (Optional) Expand Link Properties and complete any of the fields under it.
- Style Class Enter a defined hyperlink style from your stylesheet. The formatting for that style will be applied to the link. (If you do not specify a style class, Central uses the parent "a" style.) For more about style classes, see the Flare online Help.
- Style ID Enter a defined style ID from your stylesheet. It will be applied to the link. For more about style IDs, see the Flare online Help.
Target Click the drop-down arrow to select the way the linked destination will open.
- Parent Frame The destination file opens in the parent frame of the current topic while hiding that topic.
- New Window/Tab The destination file opens in a new browser window or tab.
- Same Frame The destination file opens in the same window frame as the current topic.
- Top Frame The destination file opens in the same output window, removing all other framesets. You might use this option, for example, if the destination topic has its own frameset.
- Popup Window The destination file opens in a popup box on top of the current topic.
- Tab Index Enter a value to specify the order in which users can tab through hyperlinks in a topic. So when a user presses the TAB key the first time in a topic, the hyperlink with an index value of 1 will be selected first, the hyperlink with a value of 2 will be selected next, and so on. If you want to skip a hyperlink, enter -1 in that field.
- Alternate Text Type a phrase that describes what the element is about. This option should be used to increase accessibility for users who are unable to view an element.
Screen Tip Type a phrase that will appear when the end user hovers over the text hyperlink in the output.
- Click Insert.
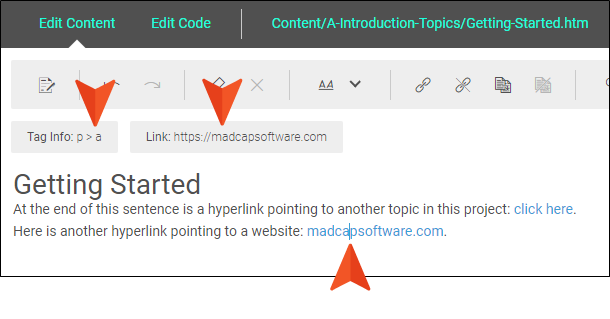
Note Text hyperlinks display in blue in the Content Editor, just as cross-references do. You can tell them apart by clicking on the link and looking in the info bar. An <a> tag indicates the presence of a text hyperlink. The info bar also shows the destination for the link.
At this time, Central does not display content exactly as it is formatted according to your Flare stylesheet, but in the output it will look just as you have designed it.
How to Edit a Text Hyperlink
-
In the upper-right of the Content Editor, click Edit.
- In the Content Editor click on any of the text for the hyperlink that you want to edit (i.e., on the blue text).
-
From the Content Editor's local toolbar, click
. -
Change any of the fields in the previous steps for field descriptions.
- Click Save.

