Renaming Snippets
You can rename a snippet file in your project.
Warning If you want to rename a snippet in Central it is better to do the renaming before inserting the snippet anywhere in the content. Otherwise, renaming a snippet can result in broken links. If you end up with broken links, try:
-
Re-inserting the snippets manually in Central (if you have a only a few applied).
-
Pulling the changes down to Flare, and performing a global find and replace to update the broken links in the code.
[Menu Proxy — Headings — Online — Depth3 ]
Permission Required?
Editing content and project files is an activity available to users with the Author status. By default, users with Author status have the following permissions set:
-

If this is deselected, then viewing files in a read-only mode is allowed. On the left side of the page, the Files vertical three-dot menu is not available.
-

If this is deselected, the XHTML in the Code view is read-only.
Editing code is regarded as a capability for an advanced user. If not done properly, the code can become malformed quickly. Administrators can prevent users from editing the code by deselecting the Edit Code permission.
For more information about permissions, see Setting User Permissions or Setting Team Permissions.
How to Rename a Snippet
-
Open a project, and select the Files tab at the top.
-
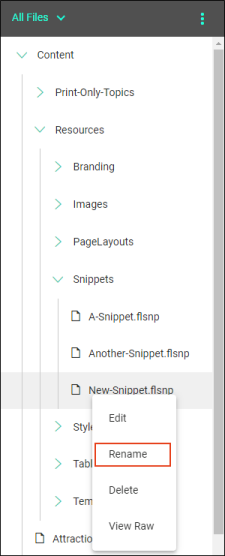
From the left side of the page, navigate to the snippet you want to rename. Right-click the snippet, and from the menu select Rename.
-
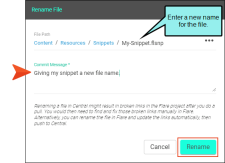
In the Rename File dialog, enter a new name for the file, enter a Commit Message, and select Rename.
You can optionally click
 to select a location for the file in the project.


