Setting Up Single Sign-On Authentication on a License
After receiving the necessary information back from your IT department, complete the following steps.
[Menu Proxy — Headings — Online — Depth3 ]
Permission Required?
For this activity, you must have the following permission setting:

For more information about permissions, see Setting User Permissions or Setting Team Permissions.
How to Set Up SSO Authentication on a License
-
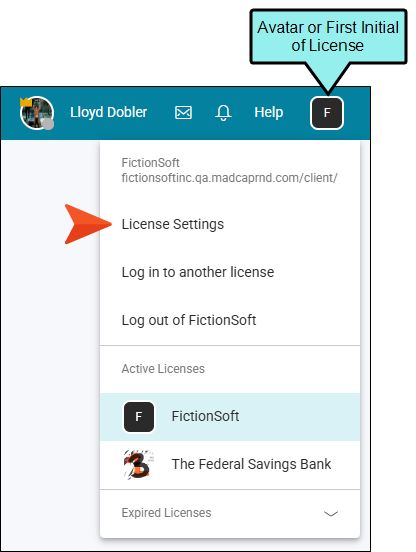
In the upper-right of Flare Online, click your license avatar (or the first letter of your license if you haven't yet chosen an avatar image) and select License Settings.
-
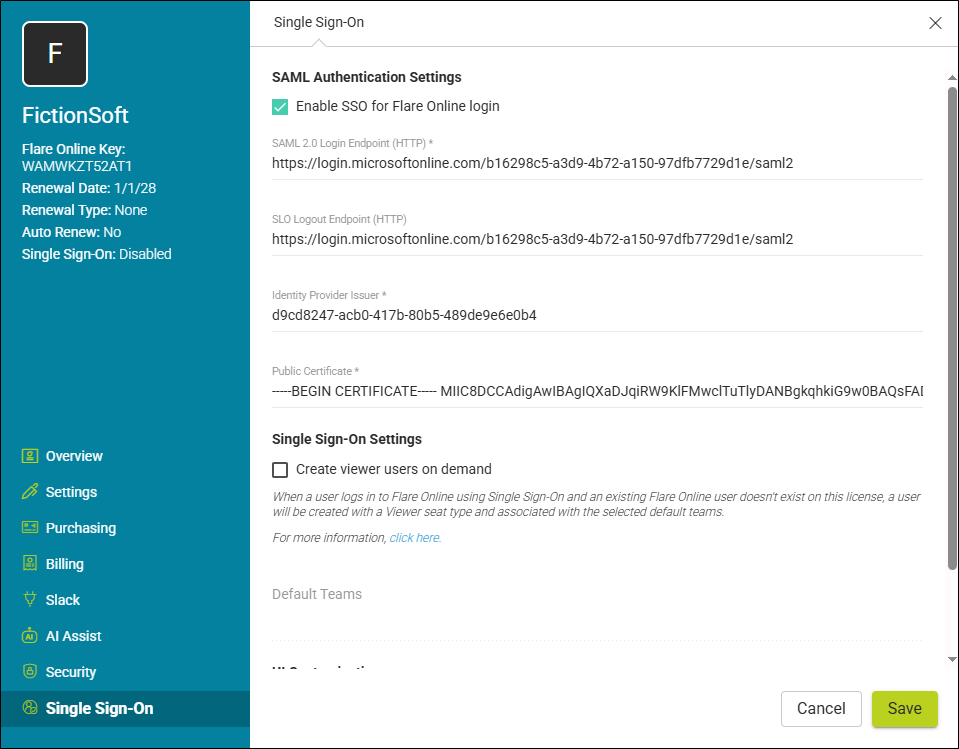
On the left side of the dialog, click Single Sign-On, then click Configure or Change Settings.
-
Enter the SAML 2.0 settings that you obtain from your IT department.
-
Enable SSO for Flare Online login This integrates SSO with your license. If this is not selected, users cannot log in via SSO and must use the other process of entering a Flare Online password manually.
-
SAML 2.0 Login Endpoint (HTTP) This path is used when individuals log in.
-
(Optional) SLO Logout Endpoint (HTTP) Single logout (SLO) is a path used when individuals log out. You can leave this field blank if you don't intend to use it. Populating the endpoint enables the single logout section for administrators to set up default logout behavior.
Note The SLO option is supported only by some IdPs, specifically those that only use the usernameID in the call to the endpoints. Check with your IT department to see if your IdP supports SLO.
-
Identity Provider Issuer This is a unique string associated with your IdP.
-
Public Certificate Copy and paste the text from your certificate into this field.
Single Sign-On Settings
Note The fields "Create viewer users on demand" and "Default Teams" are covered in the next set of steps, which are optional. See Creating Viewer Users On Demand.
Single Logout Settings
For this section to be enabled, the SLO Logout Endpoint (HTTP) must be used.
-
Let each user decide The administrator allows each user to decide individual logout preferences. In other words, the logout behavior is determined at the user level. The user profile includes the check box Log out of single sign-on identity provider when logging out of Flare Online. If you select to enable this option, you will be logged out of Flare Online and the IdP. If you select to disable this option, you will be logged out of Flare Online but will remain logged into the IdP.
-
Always The administrator is requiring that every time a user logs out of Flare Online, the user is also logged out of the IdP. Use this option for increased security. Users do not remain logged into the IdP even after logging out of the application. The administrator manages this option at the license level, and it overrides an individual’s settings in the user profile.
-
Never When a user logs out of Flare Online, the user remains logged into the IdP. The administrator manages this option at the license level, and it overrides an individual’s settings in the user profile.
UI Customization
-
Login Button Label By default, the button label is "Log in with third party," but you can change it. For example, you might want it to be more specific to your SSO provider (e.g., Microsoft Login).
-
-
Click Save.
What’s Next?
After enabling SSO and providing the configuration information, there isn't anything else you must do. However, you might decide you want to create viewer users on demand. In addition, individual Flare Online users might want to determine their own logout behavior. See Other Activities for Single Sign-On.
