File Properties
Flare Online lets you edit important file properties in a File Properties Editor. You can make quick file-level configuration changes during day-to-day authoring, cleanup work, or release preparation, and manage common file-property settings such as stylesheets, template pages, and whether a topic is searchable in published output. You can also view general properties for supporting assets like images and snippets.
[Menu Proxy — Headings — Online — Depth3 ]
Permission Required?
Editing content and project files is an activity available to users with the Author status. By default, users with Author status have the following permissions set:
-

If this is deselected, then viewing files in a read-only mode is allowed. On the left side of the page, the Files vertical three-dot menu is not available.
-

If this is deselected, the XHTML in the Code view is read-only.
Editing code is regarded as a capability for an advanced user. If not done properly, the code can become malformed quickly. Administrators can prevent users from editing the code by deselecting the Edit Code permission.
For more information about permissions, see Setting User Permissions or Setting Team Permissions.
Where Are File Properties?
When you select a file, it displays in the workspace.
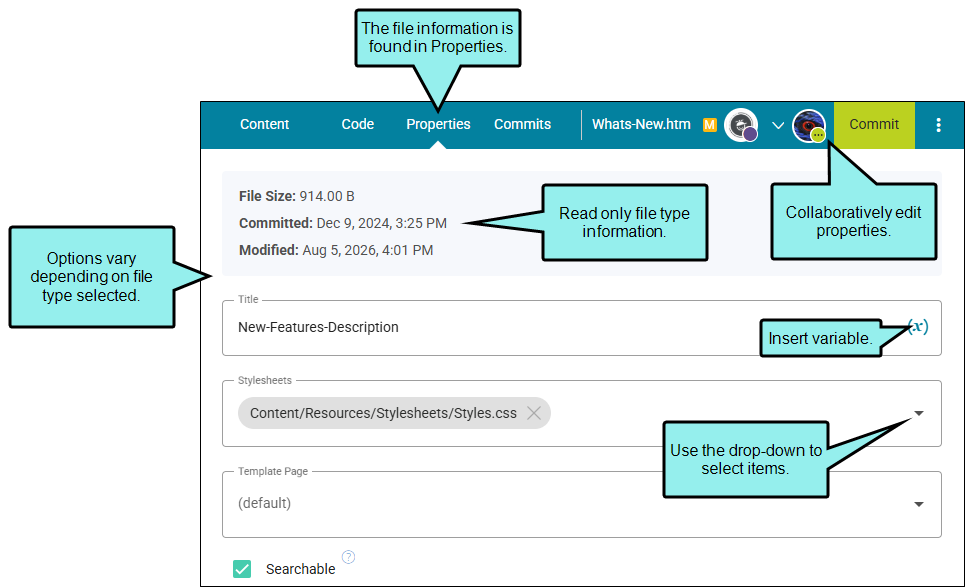
A Properties tab displays in the editor if applicable, with other relevant file tabs (i.e., Content, Code, Commits). Flare Online supports property information for all file types from the Content and Project folders but note that properties are based on the file type, not on the folder where the file lives. The File Properties Editor includes read-only information and various other options, depending on the file type. If the selected file has an editor or "viewer" (e.g., for an image), it opens the specific editor for that file by default.
In addition, multiple users can make collaborative edits to properties and retain all sets of updates when done.
Note The profile holds project file information and settings that you can apply to a project (i.e., icon color, description, initials, name), and the project file from the workspace lets you change the properties. A key difference is where the information is written. The profile writes to the database, whereas the workspace writes to the file and is tied to Git.
How to Edit File Properties
-
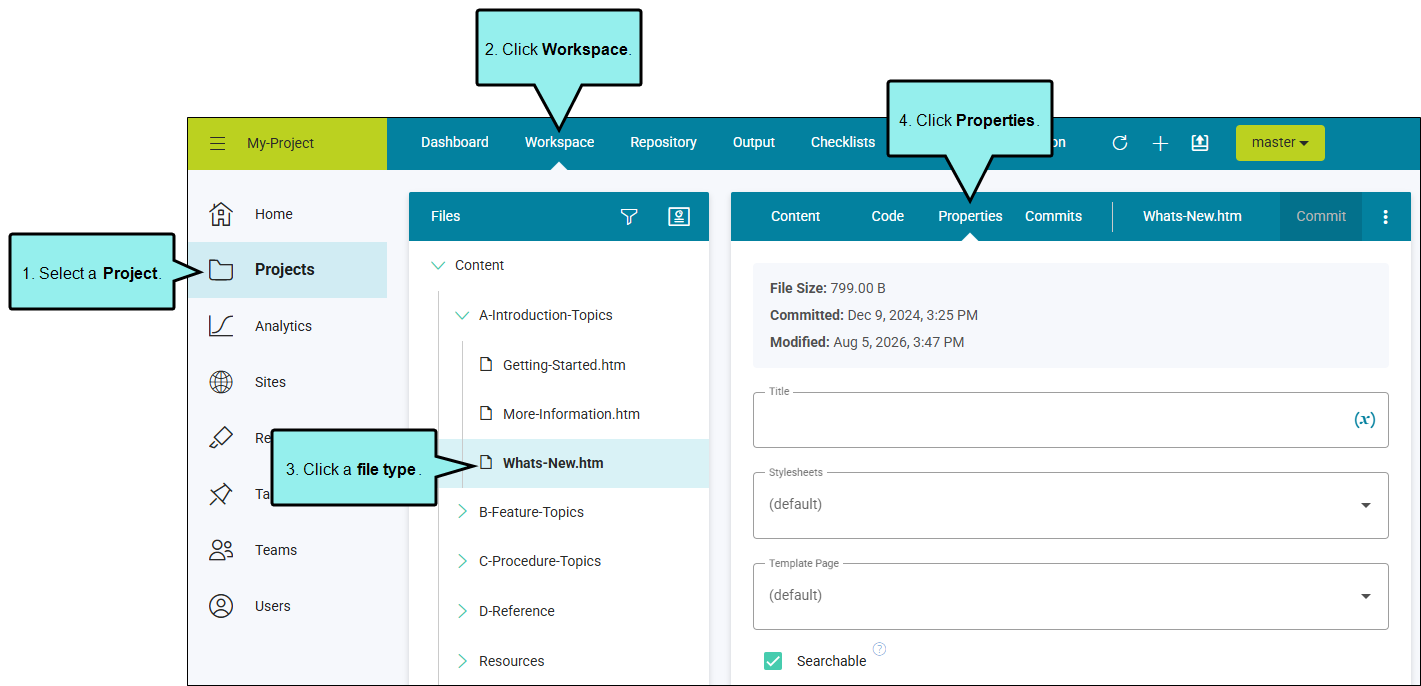
On the left side of the Flare Online interface, click Projects.
-
Select a project to open it.
-
Click the Workspace tab at the top of the screen.
-
From the left side of the page, expand the existing folders to navigate to a file. You can also click
 to search for a specific file.
 -
Select a file. It displays in the editor to the right.
- At the top of the editor, select the Properties tab.
- Review properties or click to edit available properties.
- Title Enter a title for the file (e.g., identify file purpose).
- Committed (read-only) Date of last file commit to the Git repository (for all files).
- Modified (read-only) Date of last document edited (only for collaboratively managed files).
- File Size (read-only) The size of a file; not for folders.
- Dimensions (read-only) Images only.
- Resolution (read-only) Images only. Only shown for image types that hold DPI metadata, such as PNG, JPEG, BMP, and TIFF. GIF and SVG are treated as resolution-independent and never show this property.
- Stylesheet Select from the drop-down to update a topic to use a different stylesheet.
- Template Page Select from the drop-down to update a topic to use a different template page.
- Searchable Select to mark a topic as searchable, to control how it displays in published output. Deselect to make a file unsearchable.
-
Click Commit.
-
In the Create New Commit dialog, enter a Commit Message.
-
Click Commit. (Or click Cancel, to back out of the process.)
Note Edits made to a file’s properties cannot be “undone” in the workspace history and are ignored by the track changes feature.

