Adding Destinations
A destination defines the folder(s) and file path where you want your publication to go for whichever host (i.e., connector) you are using. You might have multiple destinations for different folder paths.
Note Your project might already include a destination folder and file, especially if you imported a project into Flare Online from Flare Desktop that already had published output. You can find them in the Files area of the Workspace tab, under Project > Destinations. However, if a destination is already in your project, you still must set up the connector.
[Menu Proxy — Headings — Online — Depth3 ]
Permission Required?
For this activity, you must have the following permission to control and allow access to external servers:

A user with Administrator rights is expected to have the Manage Integrations permission to integrate a connector with a Flare Online license.
For this activity, you must have the following permission:

Users associated with a project only need the Publish Builds permission for publishing output.
For more information about permissions, see Setting User Permissions or Setting Team Permissions.
How to Add a Destination
- On the left side of the Flare Online interface, click Projects.
- In the grid, click the name of the project associated with the license that includes the connector, and select the Workspace tab at the top.
- Click
 .
. - In the Add File dialog, click the File Type drop-down, and select Destination.
-
In the File Path field, enter a path and a name for the new file.
Note Alternatively, click
 to select a location for the file in the project, and Accept the file path. Then in the File Path field, enter a name for the file.
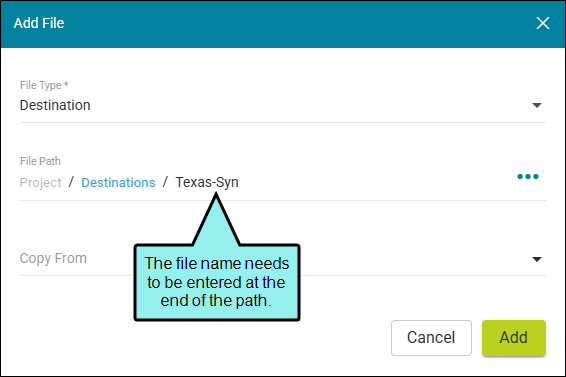
Note You might notice the File Path displays black or blue lettering. The blue items are folders, and you can click the item to jump to that folder.
For example, in the Add File dialog, a file path contains several folders (indicated by blue lettering) before the filename.

If the "Folder1" item is clicked, you know longer see the subfolders.

-
(Optional) In the Add File dialog, from the Copy From drop-down, you can select an existing destination file to use. This copies all the settings from the existing destination file to the new file, providing a base of settings to start with for your file.
-
Click Add. A new file is created and opens in the Destination Editor. You can edit the destination settings, or you can skip that for now and commit your changes.
- Click Commit.
-
In the Create New Commit dialog, verify the new file path (and edit if necessary), and enter a Commit Message.
-
Click Commit. (Or click Cancel, to back out of the process.) The new destination file is added to the project.
