You can edit the format for a custom variable to change how the system date and time are displayed. You can also add multiple alternate definitions to a variable. For example, you might want to use different date and time variables for audiences in different time zones. You can associate multiple definitions with the same variable and use the appropriate one wherever necessary by choosing it in a particular target.
[Menu Proxy — Headings — Online — Depth3 ]
Permission Required?
Editing content and project files is an activity available to users with the Author status. By default, users with Author status have the following permissions set:
-

If this is deselected, then viewing files in a read-only mode is allowed. On the left side of the page, the Files vertical three-dot menu is not available.
-

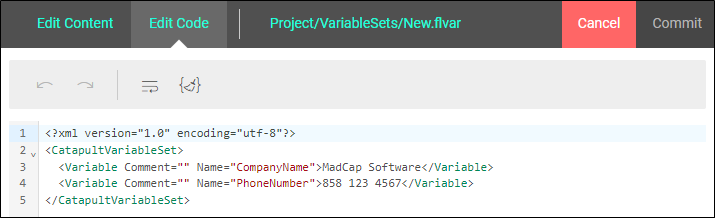
If this is deselected, the XHTML in the Code view is read-only.
Editing code is regarded as a capability for an advanced user. If not done properly, the code can become malformed quickly. Administrators can prevent users from editing the code by deselecting the Edit Code permission.
For more information about permissions, see Setting User Permissions or Setting Team Permissions.
How to Edit a Date/Time Variable
-
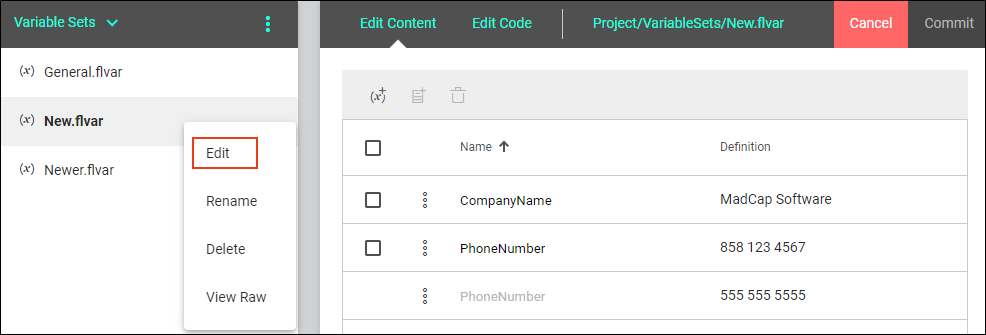
Open a project, and select the Files tab at the top.
-
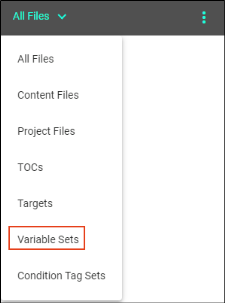
From the left side of the page, with All Files showing, navigate to and select a variable file.
Tip Click the All Files drop down, and select Variable Sets. This filters only the variable files to display in the files panel.
-
In the Variables Editor, click Edit.
Tip From the left side of the page, you can right-click to select and open a variable set directly in editing mode. From this menu, you can also rename, delete, or view raw (i.e., opens the file code in a browser).

-
From a variable row, click
 and select Edit Definition, or you can right-click the variable row for the same list.
 -
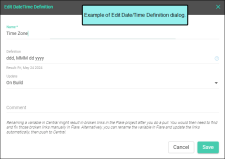
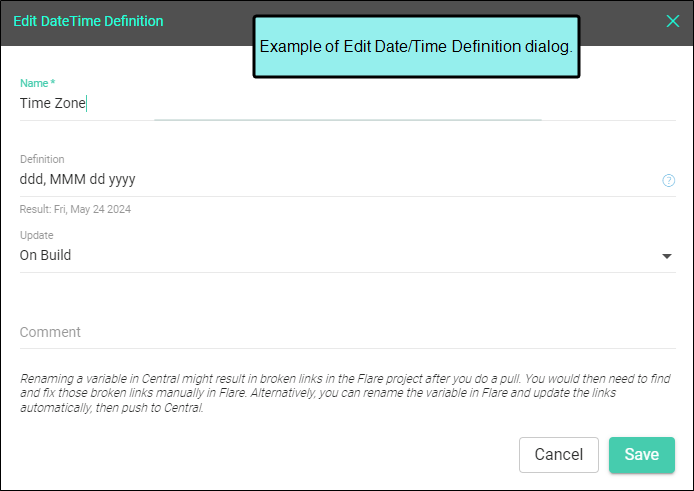
In the Edit DateTime Definition dialog, you can change the name, definition, update, or comment of the definition.
-
Name Edit the name of the variable.
-
Definition For a date and time definition, enter a combination of format specifiers.
Specifiers are based on Microsoft's custom date and time format strings. For details of the specifiers available, see:
Copyhttp://msdn.microsoft.com/en-us/library/8kb3ddd4.aspxHere are some of the more common specifier combinations:
Specifier Combination
Result
MMMM dd, yyyy hh:mm:ss tt
July 09, 2013 03:55:53 PM
hh:mm:ss tt dd MMMM, yyyy
03:55:53 PM 09 July, 2013
dddd MMMM dd, yyyy
Tuesday July 09, 2013
ddd MM/dd/yy
Tue 07/09/13
-
Update From the drop-down select how you want the variable to display the date and time.
-
Manually The variable displays the date and time when the variable was created. You can update the variable manually, and it will display the date and time when it was most recently updated.
-
On File Creation The variable displays the date and time that you created the file.
-
On File Save The variable displays the date and time that you last saved the file.
-
On Project Save The variable displays the date and time that you last saved all the files in the project.
-
On Build The variable displays the date and time of the most recent project build. This is the default Date/Time variable type.
-
-
Comment (Optional) Enter a comment to associate with the variable.
-
-
Click Save.
-
(Optional) You can further edit a variable definition by removing it. From a variable row, click
and select Delete Definition, or you can right-click the row and select Delete Definition. This removes only the selected definition from the Variables Editor. (If there are multiple definitions defined, and you remove a primary definition for the variable, the next alternate definition becomes the primary definition.)Note To remove a variable and all its definitions from the Variables Editor, do one of the following.
-
From a variable row, select the check box, and from the local toolbar click
 .
. -
Click
and select Delete Variable. -
Right-click the variable row, and select Delete Variable.
-
-
Click Commit. (Or click Cancel, to back out of the process.)
-
In the Create New Commit dialog, enter a Commit Message.
-
Click Commit.
How to Add an Alternate Date/Time Variable Definition
-
Open a project, and select the Files tab at the top.
-
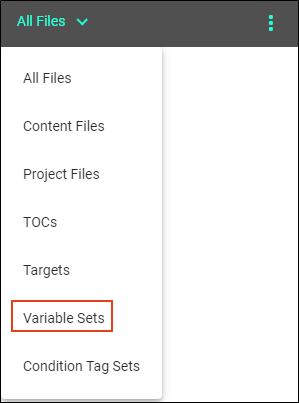
From the left side of the page, with All Files showing, navigate to and select a variable file.
Tip Click the All Files drop down, and select Variable Sets. This filters only the variable files to display in the files panel.
-
In the Variables Editor, click Edit.
-
Select a variable row, select the check box, and from the local toolbar click
 . Be sure to select an existing Date/Time type variable row.
Note Alternatively, from a variable row, click
and select Add Definition, or you can right-click the variable row for the same list. -
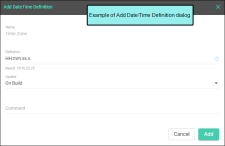
In the Add DateTime Definition dialog, populate the fields.
-
Definition For a date and time definition, enter a combination of format specifiers.
Specifiers are based on Microsoft's custom date and time format strings. For details of the specifiers available, see:
Copyhttp://msdn.microsoft.com/en-us/library/8kb3ddd4.aspxHere are some of the more common specifier combinations:
Specifier Combination
Result
MMMM dd, yyyy hh:mm:ss tt
July 09, 2013 03:55:53 PM
hh:mm:ss tt dd MMMM, yyyy
03:55:53 PM 09 July, 2013
dddd MMMM dd, yyyy
Tuesday July 09, 2013
ddd MM/dd/yy
Tue 07/09/13
-
Update From the drop-down select how you want the variable to display the date and time.
-
Manually The variable displays the date and time when the variable was created. You can update the variable manually, and it will display the date and time when it was most recently updated.
-
On File Creation The variable displays the date and time that you created the file.
-
On File Save The variable displays the date and time that you last saved the file.
-
On Project Save The variable displays the date and time that you last saved all the files in the project.
-
On Build The variable displays the date and time of the most recent project build. This is the default Date/Time variable type.
-
-
Comment (Optional) Enter a comment to associate with the variable.
-
Click Add.
-
Click Commit. (Or click Cancel, to back out of the process.)
-
In the Create New Commit dialog, enter a Commit Message.
-
Click Commit.

What’s Noteworthy?
Note Keep the following in mind when editing variables:
-
In the Edit Content tab, you can sort the order of the Name column in three ways: ascending, descending, and not set (items order in file).
-
Selection of the variables determines the state of the items in the local toolbar. For example, an empty selection (no boxes selected) only enables the Add Variable button. A single selection enables all buttons. A multi-selection enables the Add Variable and Remove Variable buttons.
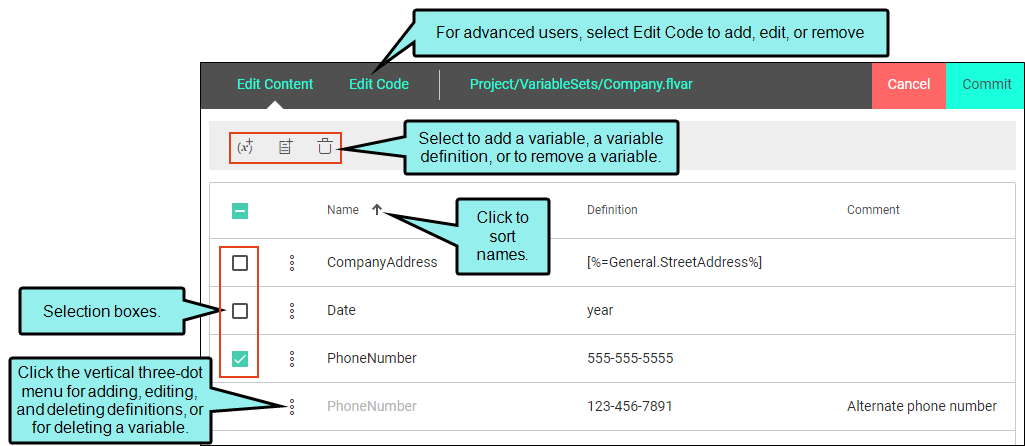
Note From the top of the interface, you can select Edit Code to add, edit, or remove items in the XML code directly. The editor only displays properties that it can edit. It is recommended that only more advanced authors use this editing mode.