Dual-Bound Projects
A dual-bound project has a first binding to a third-party source control provider—such as Git, Perforce Helix Core, Subversion, or Team Foundation Server—and a second binding to Flare Online. Some might choose this model because it allows them to use a source control provider they're comfortable with, while also taking advantage of features in Flare Online.
However, if possible, it's recommended that you use the single-bound setup since it's simpler and more streamlined. With the dual-bound model, you use the first source control binding to do most of the version control work; the Source Control ribbon in Flare Desktop is used only for tasks related to the first binding. Then periodically, you will use the Flare Online window pane in Flare Desktop to upload (or “push”) the latest files from your local copy of the project up to Flare Online via the second binding; the Source Control ribbon in Flare Desktop is not used for the second binding. However, keep in mind that creating and synchronizing branches (other than master) between Flare Desktop and Flare Online is supported only with a single-bound project or with a Git-Flare Online dual-bound setup.

Note It is possible for multiple people working on a dual-bound project to push files to Flare Online. However, if you are using a source control provider other than Git for the first binding, the most recently pushed files are the ones that are used in Flare Online. In other words, the last person to push "wins." To avoid issues, be sure that you have the most recent version of file changes from all other writers in your local project before you push. You may even want to limit users' permissions
Note Your first source control binding (between Flare Desktop and a third-party provider) should be done from the Flare Desktop interface, rather than from another tool. Otherwise, Flare Desktop and Flare Online will not recognize that binding. If you already have a project that was bound using another tool, you have a couple of options:
- You can remove the binding and then bind again using Flare Desktop.
- You can create a new project, importing from source control. This method allows you to retain the repository.
[Menu Proxy — Headings — Online — Depth3 ]
How to Use a Dual Binding—Perforce, Subversion, and TFS
Note Flare Online supports branches from Git only. Therefore, if you want to use branching in your project and work with those branches in Flare Online, we recommend that you use a single-bound setup instead, where Git will be operating behind the scenes.
- Open the project in MadCap Flare Desktop, and make sure your project is already bound to a third-party source control provider.
- Select View > Flare Online. The Flare Online window pane opens.
- Be sure to log in if you aren't already.
-
Upload (bind) your project to Flare Online.
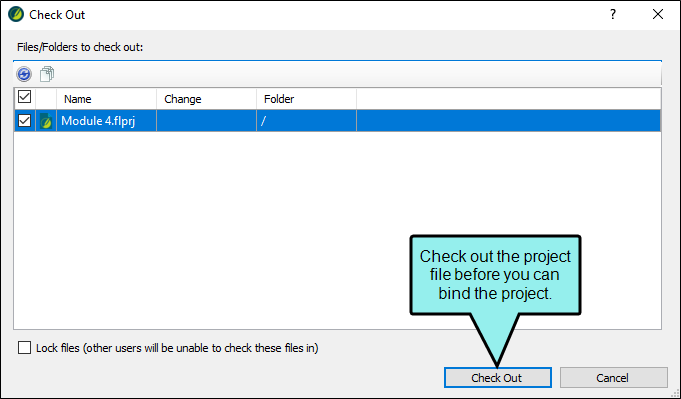
Because you are dual-bound, Flare Desktop will prompt you to check out your project file before you can upload the project.
- Check in the project file to your third-party source control provider.
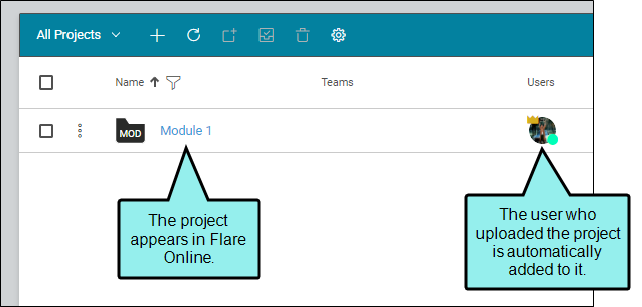
- In Flare Online, assign users to the new project and make sure they have “Push” permissions. This gives the users the ability to push local content to the project in Flare Online.
-
Newly assigned users must now do one of the following, depending on whether or not they already have a copy of the project on their local machine:
- Have a Local Copy Get the latest version of the project file from the third-party source control provider.
-
Do Not Have a Local Copy Import the project from the third-party source control provider using the Import Project from Source Control Wizard.
Note If your project is already bound to a third-party source control provider other than Git—i.e., you are working in a dual-bound model as opposed to a single-bound model—the Import option in the Flare Online window pane will be disabled. You will have to import your project directly from source control using your non-Flare Online binding.
If you already have the project on your machine, you do not need to reimport the project from source control. Instead, you can get the latest version from source control by using the Flare Online Source Control ribbon.
Be sure that you have the latest version of the project.
Either option will give users the most current version of the project.
-
In Flare Desktop, make changes to your files. You should manage all of your file changes using your third-party source control provider, using the following actions:
- Check In Check in your changes to source control.
- Get Latest Get the latest version of your teammates' changes from source control and add them to your local project.
- When you are done making changes, push your final changes to Flare Online. To do this, click
 in the Flare Online window pane.
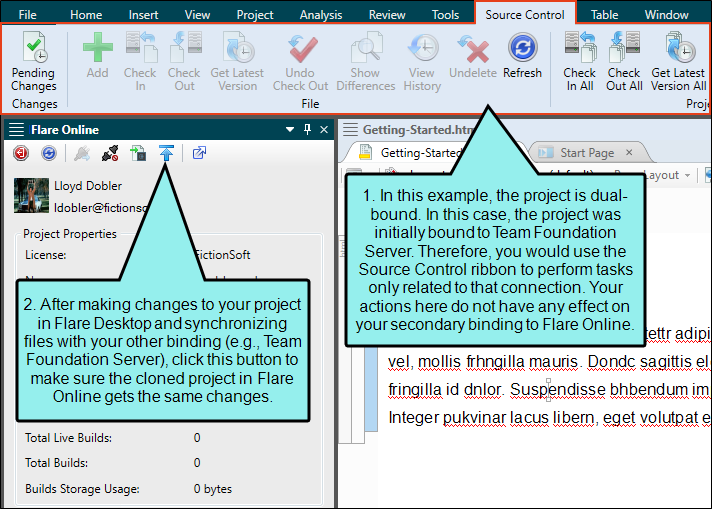
Example You are working on a team of writers and your project is bound to Microsoft Team Foundation Server (TFS). Therefore, that is your primary source control provider, and the source control connection between Flare Desktop and Flare Online serves as a secondary source control provider.
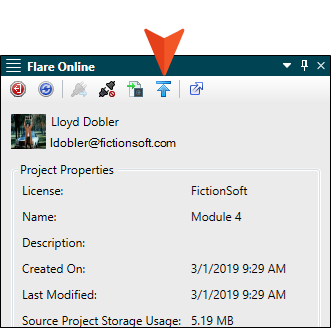
When you first start working with Flare Online, you have to upload (or bind) the project to Flare Online. To do this, click  in the Flare Online window pane.
Because the project is bound to TFS, you will have to check out the project file before you can bind the project (Flare Desktop will prompt you to do this). Binding the project will establish the connection between Flare Desktop and Flare Online, and creates a copy of the project in Flare Online.

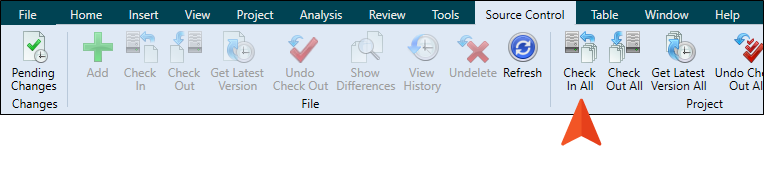
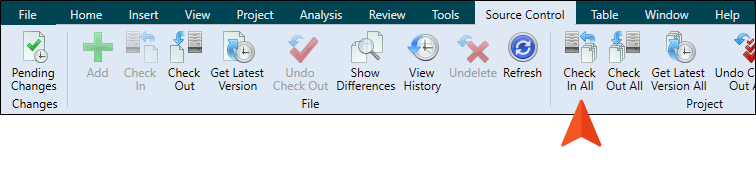
Click Check In All in the Flare Desktop Source Control ribbon.
If any writers on the team do not already have a local copy of the project, they should import the project from TFS so they can work on the project locally (they cannot import from Flare Online because the project's primary source control location is TFS). To import the project, they will use the Import Project From Source Control Wizard.
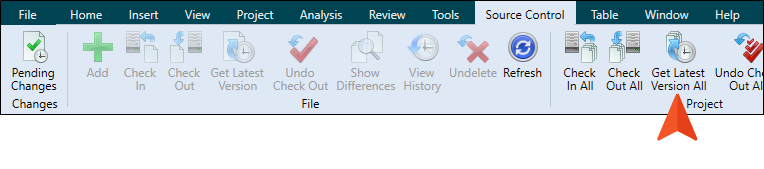
Writers on your team who already have the project locally do not need to reimport. They simply need to get the latest version of the project by clicking Get Latest All in the Flare Desktop Source Control ribbon.
Now that everyone has the updated project file, you can all work on the project and make changes using TFS. However, a user with the "Manage Teams/Projects" permission also needs to assign your teammates to the project in Flare Online
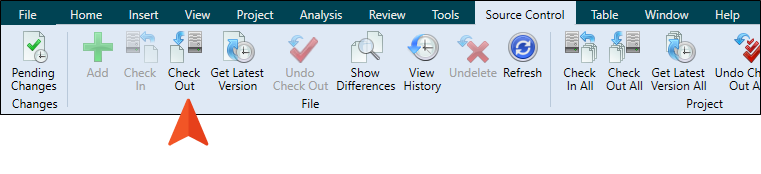
As you work on files in Flare Desktop, you should check out your files using Flare Desktop's Check Out feature on the Flare Desktop Source Control ribbon (or using automatic checkouts, if you have this enabled).
After you are finished making changes, you should check in your changes to TFS. You can do this by clicking Check In All on the Flare Desktop Source Control ribbon. This will upload your changes to TFS.
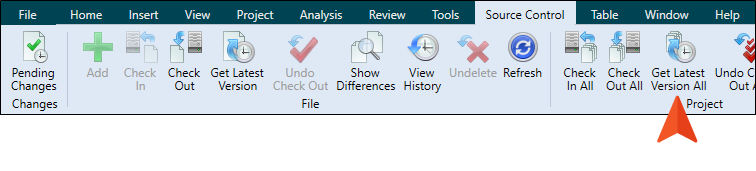
Once your changes are checked in, you should make sure that you have the latest version of your teammates' files, as well. To do this, click Get Latest Version All on the Flare Desktop Source Control ribbon. This will download the latest changes of all of the files to your local version of the project.
When you and your teammates are finished making changes, you need to synchronize your local copy of the project with the copy of the project in Flare Online. To do this, click in the Flare Online window pane.
This will push your local changes up to Flare Online. It is important to remember that the last person who pushes their changes to Flare Online wins, so be sure that everyone has the latest version of the project files before you push (or even limit some users' permissions so they are not able to push;
Once your files are up in Flare Online, you can publish output and manage your project.
How to a Use Dual Binding—Git
In the past, the primary reason for having a Git-Flare Online dual-bound setup was to be able to use branching in your project. That's because in past versions you could only push files to Flare Online from the master branch. However, you can now push files and changes from any Git branch up to Flare Online. Therefore, unless you have another good reason for using a Git-Flare Online dual-bound setup, we recommend that you use a single-bound setup instead, with just one binding between Flare Desktop and Flare Online
- Open the project in MadCap Flare Desktop.
- Be sure your project is already bound to Git.
- Make sure all changes are committed before binding to Flare Online.
- Select View > Flare Online. The Flare Online window pane opens.
- Be sure to log in if you aren't already.
-
Upload (bind) your project to Flare Online.
- Push the project file to Git.
- In Flare Online, assign users to the new project and make sure they have “Push” permissions. This gives the users the ability to push local content to the project in Flare Online.
-
Newly assigned users must now do one of the following, depending on whether or not they already have a copy of the project on their local machine:
- Have a Local Copy Pull the latest version of the project file from Git.
-
Do Not Have a Local Copy Import the project from Git using the Import Project from Source Control Wizard.
Important If you are using a Git-Flare Online dual-binding, you can import projects from Git (using the Import Project From Source Control Wizard) or from Flare Online. The project will be the same. However, if you import from Flare Online, you will only be able to push changes to and pull changes from Flare Online. If you import from Git, you will be able to push changes to and pull changes from Flare Online as well as your main Git repository. This is because the project in Flare Online has no connection to the original Git repository, and if you import from Flare Online you will not have those source control bindings.
Either option will give users the most current version of the project.
-
In Flare Desktop, make changes to your files. When working in a Git-Flare Online dual-bound situation, you can make changes to both Flare Online and Git, using the following actions:
-
Pull Pull your teammates' changes from Git and add them to your local project.
- Push Push your changes to source control.
Note It does not matter which location (i.e., Git or Flare Online) you push to or pull from first, as long as you push the files to both Git and Flare Online and that everyone on your team uses the same workflow.
-
-
(Optional) If the changes in Git or Flare Online become out-of-sync with each other (i.e., changes are made in one location but not the other), the Resolve Conflicts dialog opens. If this happens, use the dialog to accept or reject other users' changes.
- When you are done making changes, push your final changes to Flare Online. To do this, click in the Flare Online window pane.
What’s Noteworthy?
Important There are multiple workflows you can use when working with a Git-Flare Online dual-binding. The steps above are only one example of how you might perform this process. Because of the potential for file conflicts, it is essential that you establish a workflow for using a Git-Flare Online dual-binding, and make sure that all your team members follow the same steps.
Note If you are using Git as your third-party source control tool for the first binding, the dual-bound model works slightly differently than it does if you are using another source control provider. In this situation, you will still use the Flare Online window pane and Source Control ribbon in Flare Desktop to manage your changes. However, you are able to pull and push files from and to either Flare Online or your Git repository. As a result, your Git repository and your Flare Online repository might be completely different, and you may encounter conflicts. In this situation, Flare Desktop's Conflict Resolution dialog will open and you can accept or reject the changes. It is recommended that you establish an internal workflow to dictate the order in which you pull and push from and to each repository to prevent conflicts and ensure that your files in Flare Online stay up-to-date. However, an even better solution is to use a single-bound setup instead of dual-binding.
Note If you are using a Git-Flare Online dual-binding, and you encounter conflicts in one repository (i.e., Git or Flare Online), you will likely encounter them in the other location as well. Conflicts in one repository will most likely need to be resolved in the other repository.
Note For more information about source control tasks and managing dual-bound projects with the various third-party providers, see the Flare Desktop Help system.

