Table of Contents Editor


A table of contents (TOC) is a common way for you to find or navigate to specific information in output. You can create many TOCs in a project. For example, if you have several TOCs, each one can be used for a different target. Or, you can use a single TOC for multiple outputs. For example, you can apply conditions on TOC entries so one TOC can be used for multiple targets.
The workspace supports collaborative editing in the TOC Editor. This means that multiple authors can open the same editor, make changes, and retain all sets of updates when done. So, not only can you have multiple TOCs in one project, but more than one person can work in the very same TOC, or in different TOCs, for the same project and branch—without running into conflicts.
[Menu Proxy — Headings — Online — Depth3 ]
Permission Required?
Editing content and project files is an activity available to users with the Author status. By default, users with Author status have the following permissions set:
-

If this is deselected, then viewing files in a read-only mode is allowed. On the left side of the page, the Files vertical three-dot menu is not available.
-

If this is deselected, the XHTML in the Code view is read-only.
Editing code is regarded as a capability for an advanced user. If not done properly, the code can become malformed quickly. Administrators can prevent users from editing the code by deselecting the Edit Code permission.
For more information about permissions, see Setting User Permissions or Setting Team Permissions.
Can I Work Collaboratively in the TOC Editor?
Yes, you can work collaboratively! And because working with a TOC for output is such a big part of authoring a project, collaborative editing is a major benefit for teams that need to share a TOC.
|
Pros |
|
The Flare Online TOC Editor supports collaborative editing in a user-friendly user interface. |
|
Since the TOC Editor supports collaborative authoring it promotes a best practice to edit TOCs in Flare Online within the same source control branch. Multiple authors can open the same editor, make changes, and retain all sets of updates when done. |
|
Collaborative editing allows teams to avoid conflicts as much as possible when working with the same TOC file. It reduces the need for time-consuming workarounds such as: (1) communicating with other authors to make sure nobody else is working in a particular TOC until you’re done making and pushing your changes in it; (2) having multiple TOCs, with only one author working in each, and then merging those multiple TOCs into one big TOC later; (3) the author who encounters a conflict would pull changes from the other person and then redo his or her own changes manually. |
|
Cons |
|
The Flare Online TOC Editor provides basic features to create and construct the TOC, but for more advanced TOC features you might need to use the Flare Desktop product. For example, since you cannot apply page layouts to TOC entries in Flare Online, PDF output might appear basic. See the Flare Desktop Help system. |
|
At this time, there is no way to drag and drop topics from the Files tree Content folder to the TOC Editor, but you can drag and drop topics within the editor itself. |
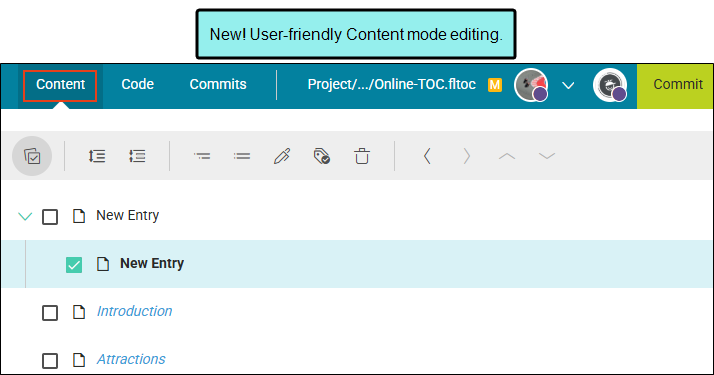
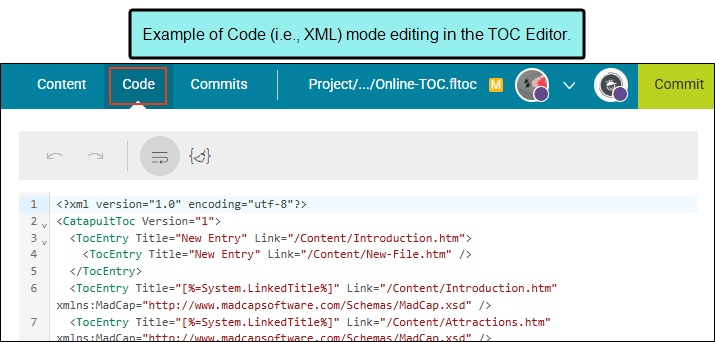
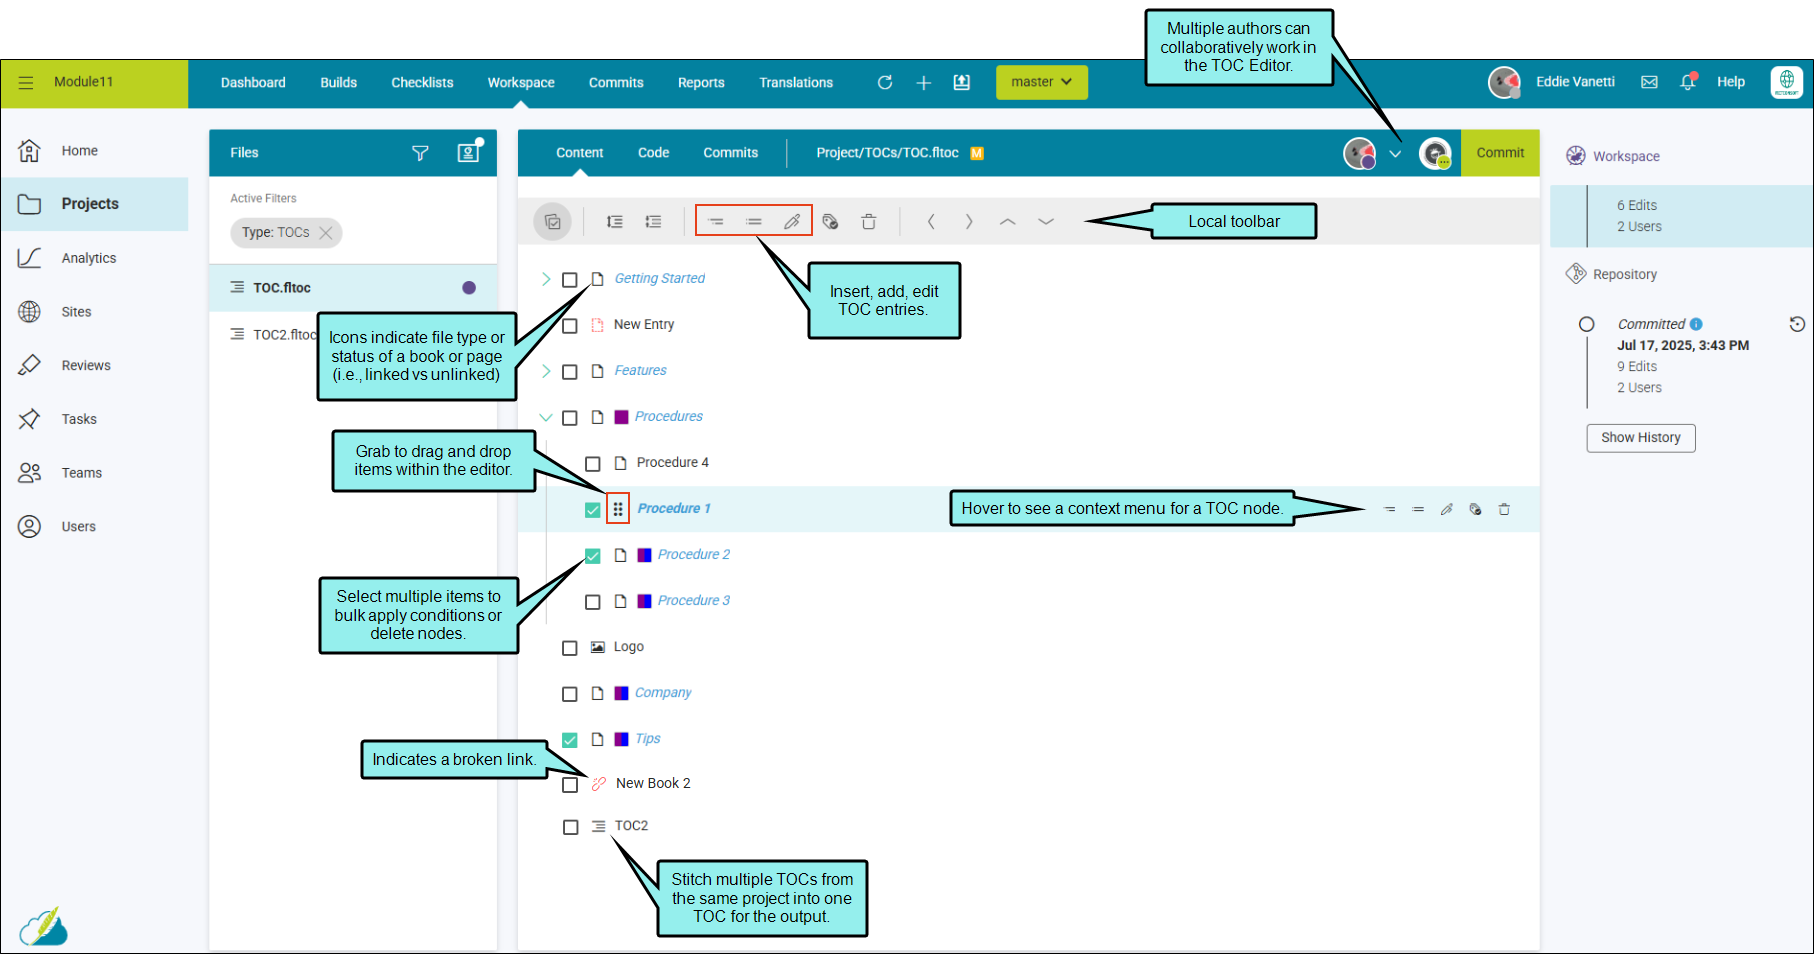
TOC Editor in the Workspace
In previous releases, the TOC functionality existed with limited capability and could only be viewed or edited in Code mode in the workspace (i.e., using XML code only). New for this release, the workspace includes a user-friendly TOC Editor in Content mode, where you can create a TOC from scratch and edit to construct your own TOC.
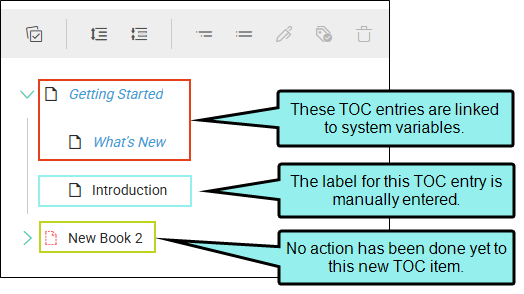
TOC Editor Diagram
The following illustrates many of the easy-to-use features included in the TOC Editor.
How to Add a TOC File
You can add as many TOC files as you want to a project.
-
Open a project, and select the Workspace tab at the top.
-
From the main toolbar, click
 to add a new file.
Note Alternatively, you can upload an external file into your project.
-
In the Add File dialog, click the File Type drop-down, and select TOC.
-
In the File Path field, enter a path and a name for the new file.
Note Alternatively, click
 to select a location for the file in the project, and Accept the file path. Then in the File Path field, enter a name for the file.
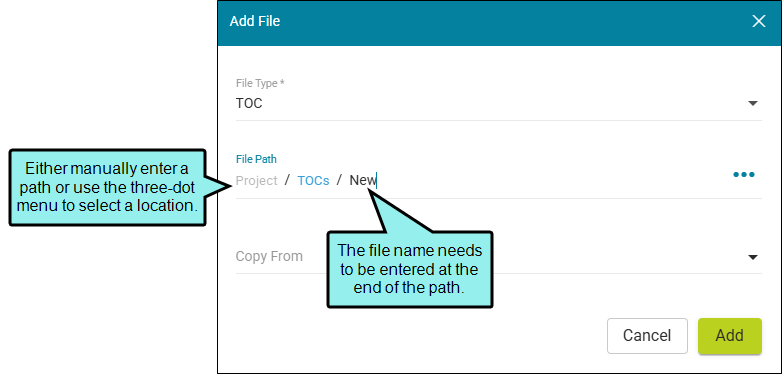
Note You might notice the File Path displays black or blue lettering. The blue items are folders, and you can click the item to jump to that folder.
For example, in the Add File dialog, a file path contains several folders (indicated by blue lettering) before the filename.

If the "Folder1" item is clicked, you know longer see the subfolders.

-
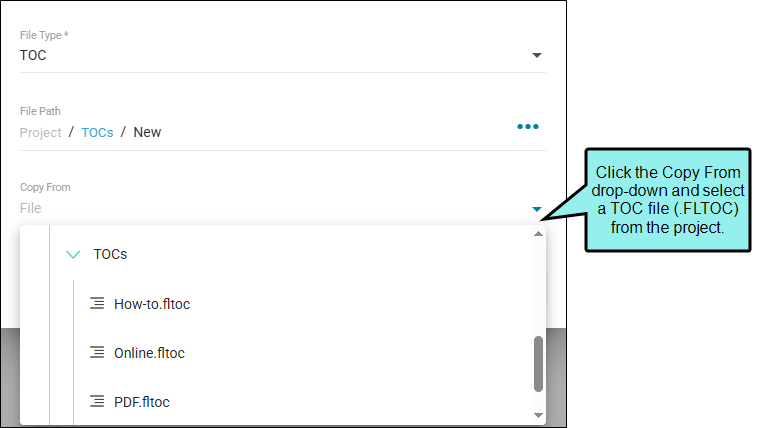
(Optional) In the Add File dialog, from the Copy From drop-down, you can select an existing TOC file to use.
-
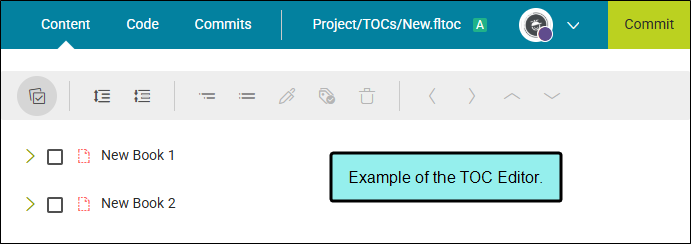
Click Add. A new file is created and opens in the TOC Editor.
-
In the upper-right corner of the editor, click Commit.
-
In the Create New Commit dialog, verify the new file path, and enter a Commit Message.
-
Click Commit. The new TOC file is added to the project.
How to Create a TOC
Books or entries are created in the TOC Editor, and then you need to link them to existing files from the project. To create the structure of your TOC, you can insert, add, edit, move, or delete TOC entries (e.g., topics, images, multimedia, TOCs).
-
Open a project, and select the Workspace tab at the top.
-
From the left side of the page, expand the existing folders to navigate to a file. You can also click
 to search for a specific file.
Tip Click the Open Filters button, and select from the File Type drop-down TOCs. This filters only the TOC files to display in the files panel.
-
Do one of the following:
-
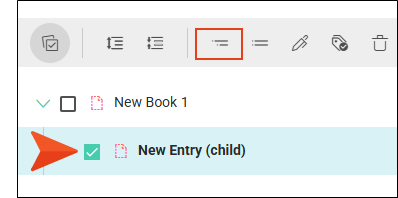
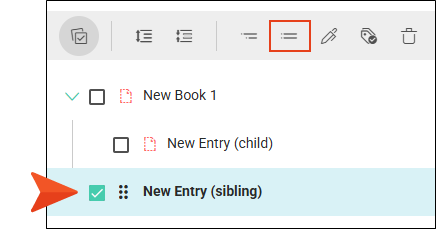
In the local toolbar, select
 (Insert child item) or
  (Add sibling item). These two options create a new TOC entry item.
Note To enable all local toolbar items, select a TOC node in the editor.
-
If there is a placeholder item, hover over the TOC node, and select from its context menu to the right
or . Or you can use  (Properties) for an item, this replaces the TOC entry with a new entry. (You can also apply conditions to entries or delete nodes.)
-
-
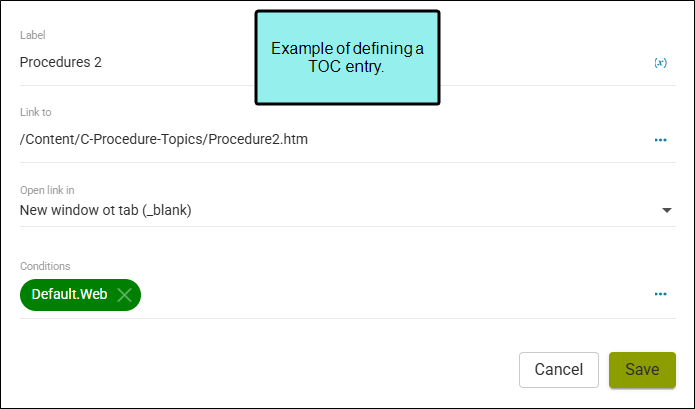
In the dialog, complete these fields.
-
Label Click
 to insert a variable from the Variables dialog, and select System > LinkedTitle. This links the topic title with the TOC label, showing the first heading from that topic as the TOC entry. The variable displays as syntax, but in the output the variable definition is shown.
 -
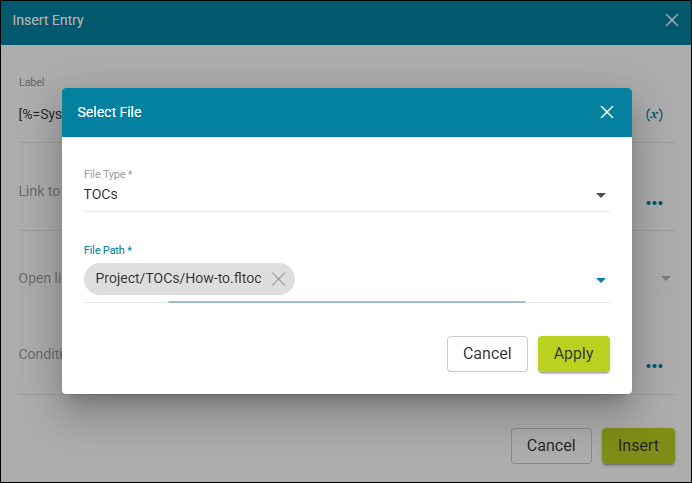
Link to Enter a file path (e.g., /Content/Introduction.htm) or click
to select a file. If the latter, in the Select File dialog, choose a File Type and File Path. 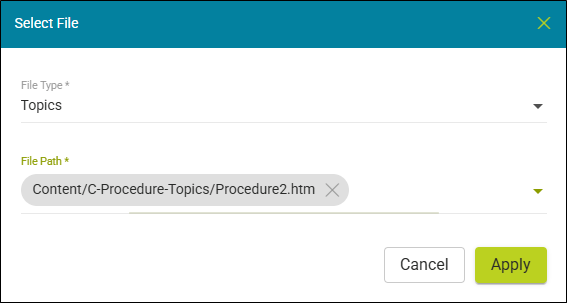
-
Open link in (Optional) From the drop-down select how the link will open in a browser. Choices are a Default frame, New window or tab (opening blank), Parent frame (of the current topic while hiding that topic), Same frame (as the current topic), Full body of the window (in the same output window but removing other framesets).
-
Conditions (Optional) Click
for the Apply Condition Tags dialog and assign condition(s) to TOC entries.
-
-
Click Insert (or Save if you opened Properties). Work through all the entries to get your TOC the way you want it.
-
In the upper-right corner of the editor, click Commit.
-
In the Create New Commit dialog, enter a Commit Message.
-
Click Commit.
Note When a new project is created with Flare Online it includes one or more placeholder TOCs, which you can change as you need. The TOC(s) provided depends on the source template selected. It might include a TOC intended for online output, online and print, or just print.
How to Edit a TOC
When you click to edit in the TOC Editor, it enters a “workspace mode,” essentially making a working copy of the file from the repository. In this mode, the file is in a non-committed state with pending changes. When editing is completed, the file needs to be committed back to the project’s repository.
- Open a project, and select the Workspace tab at the top.
-
From the left side of the page, expand the existing folders to navigate to a file. You can also click
to search for a specific file.Tip Click the Open Filters button, and select from the File Type drop-down TOCs. This filters only the TOC files to display in the files panel.
Tip From the left side of the page, if you right-click the TOC, you can open it from the popup. From this menu, you can also rename, delete, or view raw (i.e., opens the file code in a browser).
-
Select a TOC file. It displays to the right in the TOC Editor.
-
(Optional) From the local toolbar, select
 . You might do this to easily select more than one TOC node to apply conditions to, move multiple items, or to remove several entries at once.
 -
(Optional) From the local toolbar, you can expand or collapse the TOC nodes by clicking
 or
or  .
. -
Hover over the TOC node, and select from its context menu to the right an editing option. (If TOC nodes are selected, you can select from the local toolbar.)
-
Insert child item Inserts an item below the selected (parent) entry.
-
Add sibling item Adds an item below the selected entry.
-
Properties Opens a dialog to edit the TOC node. You can update the label, override the file path link, indicate how it opens in a browser, or apply conditions.
Example You have a new TOC with placeholder items in it that are "unlinked."
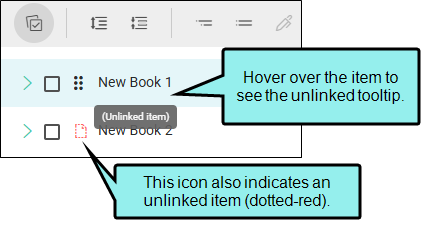
Select to edit the properties.
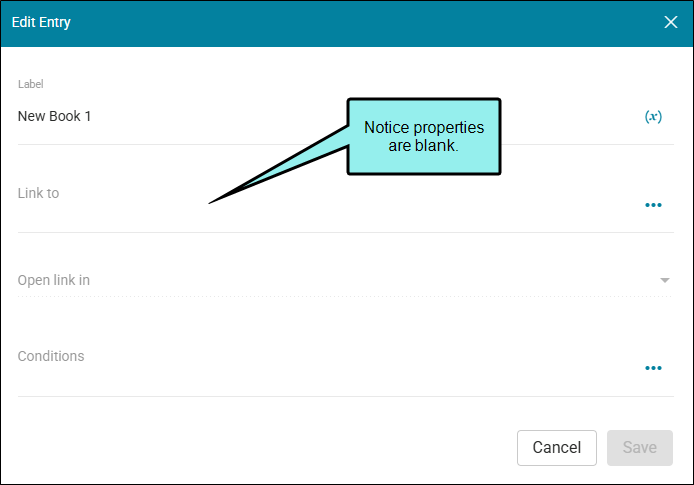
Populate and save the desired fields: Label, Link to, Open link in, Conditions.
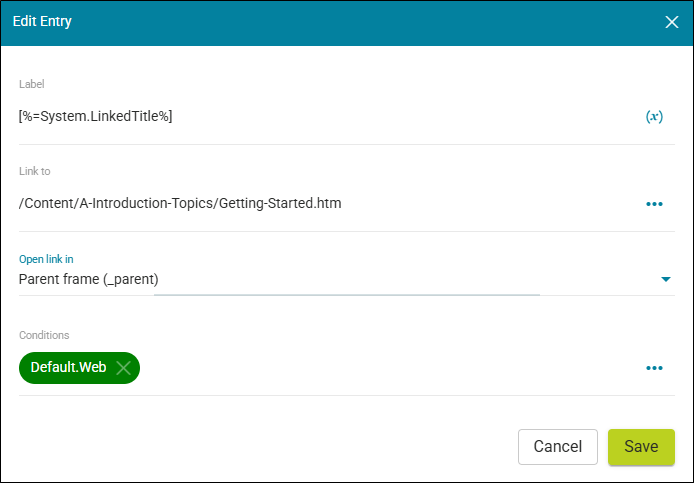
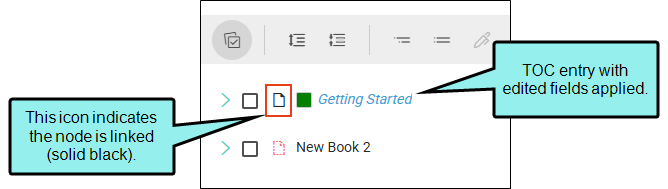
The top TOC entry is now linked to a file in your project. The variable selected in the Label field ensures that the title (often the first heading found in the topic) is automatically used as text for that TOC entry.
-
Apply Conditions Opens a dialog that lets you apply conditions to content.
Note You can apply condition tags to specific entries in your TOC. This lets you keep some TOC entries from being published in the output if you do not want to have the entire TOC built.
-
Delete Deletes the selected TOC entry or entries (if multiple are selected).
-
-
(Optional) You can rearrange your TOC entries. Do one of the following:
-
In the editor, click
 to drag and drop a node to another location in the TOC.
 -
Select a TOC entry (or entries), and from the local toolbar use the arrow buttons to move the node(s).
-
-
In the upper-right corner of the editor, click Commit.
-
In the Create New Commit dialog, enter a Commit Message.
-
Click Commit. (Or click Cancel, to back out of the process.)
Blue vs. Black Text
When working on a TOC, you might notice text colored blue or black. This does not mean that the text will show up as blue or black in the output.
If the text is blue it means that the TOC entry contains a system variable
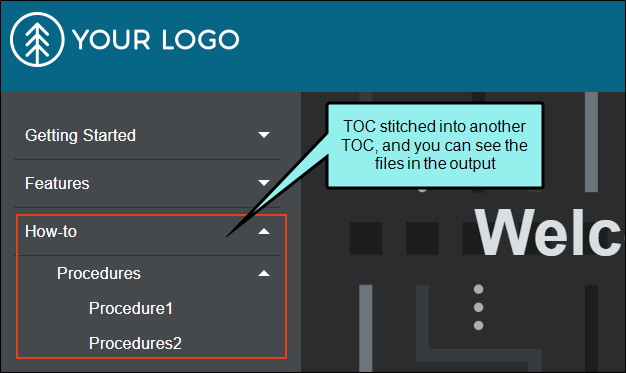
Stitching TOCs Together
You can merge or "stitch" multiple TOCs from the same project into one TOC for the output.
Example You have a main online TOC established, but you also have another smaller TOC that only includes topics with how-to procedures in them. You want to include this smaller TOC with your output. Here's one way to do that.
Select the location in your main TOC to insert the other smaller TOC.
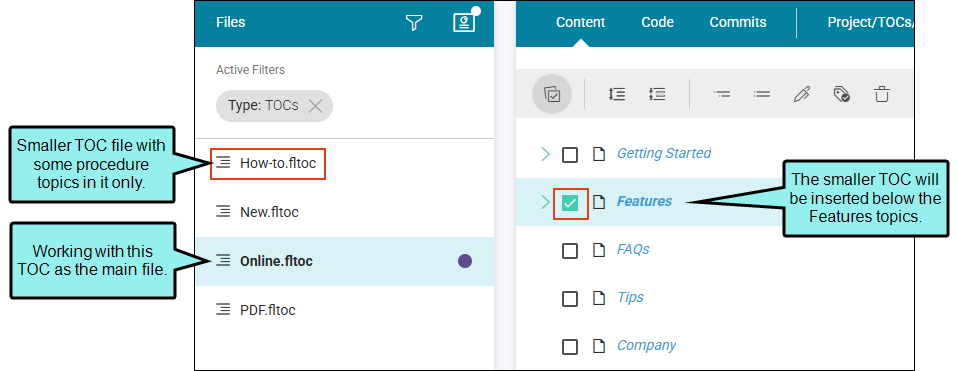
You click to add a sibling item, and link it to the smaller "How-to" TOC from the same project.
The TOC is inserted into your main TOC. At this time, you cannot open linked items from the TOC Editor.
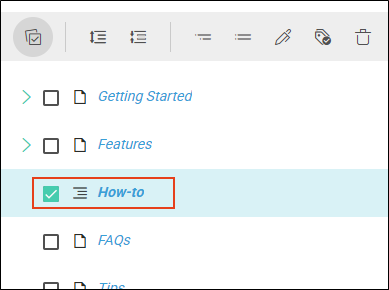
When you build the project with the associated main TOC, the output displays with the smaller TOC stitched in.
TOC Editor Toolbar
You can use the options in the toolbar at the top of the TOC Editor in Content mode to accomplish different tasks.
|
Option |
Description |
|---|---|
|
|
Toggle the Multiple Selection option to show/hide check boxes next to each TOC entry. You can apply conditions and delete multiple TOC nodes. |
|
|
Expands all TOC nodes. |
|
|
Collapses all TOC nodes. |
|
|
Inserts a child item (if no entries are selected it places the page at the top of the TOC). If you select a TOC node and then click to insert a child item, it inserts and indents the item below the selected (parent) entry. |
|
|
Adds a sibling item (if no entries are selected it places the book at the bottom of the TOC). If you select a TOC node and then click to add a sibling item, it adds below the selected entry. |
|
|
Opens a dialog that lets you edit properties for the TOC entry. |
|
|
Opens a dialog that lets you apply conditions to a TOC entry. |
|
|
Deletes the selected TOC entry or entries (if multiple are selected). |
|
|
Moves the selected TOC node to the left in the TOC tree. (You can also drag and drop items within the editor to rearrange it.) |
|
|
Moves the selected TOC node to the right in the TOC tree. (You can also drag and drop items within the editor to rearrange it.) |
|
|
Moves the selected TOC node up in the TOC tree. (You can also drag and drop items within the editor to rearrange it.) |
|
|
Moves the selected TOC node down in the TOC tree. (You can also drag and drop items within the editor to rearrange it.) |


Note If you hover over a TOC node, notice a blue banner displays with a context menu at the right. The items in this menu are the same as in the local toolbar.
TOCs and Targets
When you are ready to build output for your project, you can select a specific TOC file to be used for a target. For online outputs, the selected TOC provides the main navigation. But for print-based outputs, that same TOC file functions more like an outline.
The most common situation is that you will have one TOC for a particular output (target). In that case, you simply associate the appropriate TOC with the target.
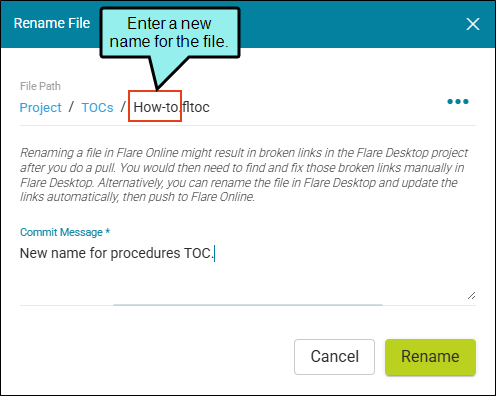
How to Rename a TOC
You can rename the default TOC tile or any others that you add to your project.
- Open a project, and select the Workspace tab at the top.
-
From the left side of the page, click
(Open Filters). -
From the Filters File Type drop-down, select TOCs.
-
Right-click the TOC you want to rename, and from the menu select Rename.
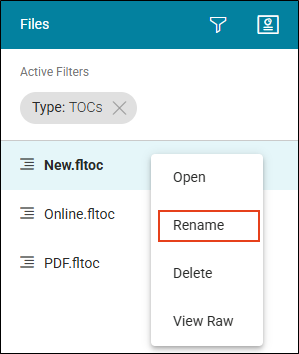
-
In the Rename File dialog, enter a new name for the file, enter a Commit Message, and select Rename.
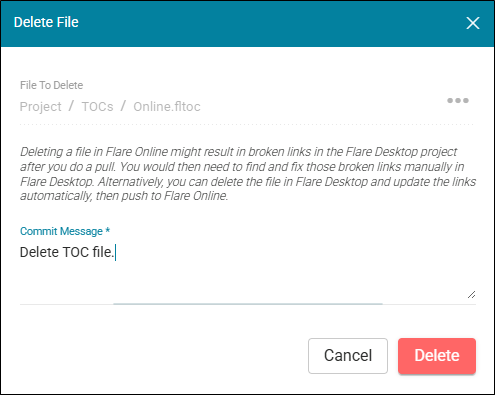
How to Delete a TOC
If necessary, you can delete a TOC from your project.
-
Open a project, and select the Workspace tab at the top.
-
From the left side of the page, click
(Open Filters). -
From the Filters File Type drop-down, select TOCs.
-
Right-click the TOC you want to delete, and from the menu select Delete.
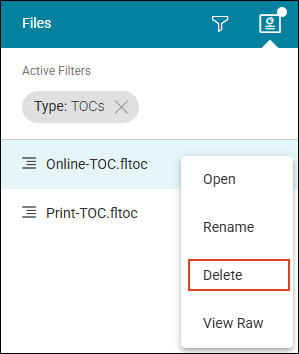
-
In the Delete File dialog, enter a Commit Message, and select Delete.