Creating a Translation Branch
A Git branch is a pointer to a snapshot of your changes, or you can think of it as a variation from the original or main state of your files. Adding a branch lets you create a new development area for your work
A translation branch is simply another development area for work specifically tied to the translation part of your project. Once created, a translation branch is available anywhere other project branches might be available in Central.
[Menu Proxy — Headings — Online — Depth3 ]
Permission Required?
Translation is an activity available to users with the Author status. You must have the following permission setting in Central:
![]()
For more information about permissions, see Setting User Permissions or Setting Team Permissions.
How to Create a Translation Branch
-
On the left side of the interface, click Projects.
-
Select a project in the grid to open it.
-
At the top of the interface, click Translations. The Translations page displays (it might be empty if no translation branches have been created yet).
-
In the toolbar, click Create Translation Package.
Note A Translation Method dialog displays for the first translation project to set up your preferred method. After initial setup, the wizard defaults to that method and subsequently starts at the Settings screen. You can, however, go back and edit the translation method.
-
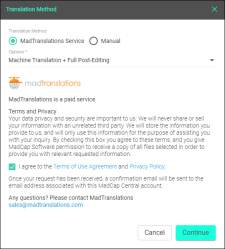
In the Translation Method dialog, select MadTranslations Service or Manual. (With MadTranslations select an option and agree to the Terms and Privacy.) Then select Continue.
-
If selecting MadTranslations Service, choose an option from the drop-down:
-
Translation Only Human translation without the use of machine translation suggestions.
-
Translation + Revision Human translation and second human performs revision. Sometimes required for medical or regulated content.
-
Machine Translation + Full Post-Editing Human translator reviews machine translation suggestions and edits what is necessary and accepts accurate machine translations.
-
Machine Translation + Full Post-Editing + Revision Machine Translation + Full Post-Editing and then a second human linguist performs revision.
Note Machine translation is translation of text by a computer or translation program. It allows for a quick translation of a large amount of content using an automated translation system, and then makes any necessary updates to the translation (e.g., using a termbase to replace certain words, fixing translations that are not accurate in context).
Then select I agree to the Terms of User Agreement and Privacy Policy, and select Continue.
-
-
If selecting Manual, click Continue.
-
-
In the Settings screen, your Translation Method of choice displays at the top. You can select
 to edit the method type.
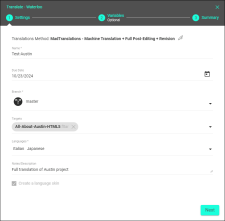
Enter the following:
-
Enter a Name for the new translation branch.
-
(Optional) Enter a Due Date for when the translation branch is due. Or, on the right-side, click
 to select a date.
 -
Enter a Branch, or select a branch from the drop-down. This is the branch that you want the new translation branch to be created from (e.g., master, release).
-
(Optional) From the Targets drop-down, select the target for the translation branch (e.g. HTML5, PDF output types). Regardless of whether or not a target is selected, the ZIP file that will be sent to the translator will include the whole project. If no targets are selected, all the existing targets in the project will be translated. If one or more targets are selected, the translator will only use those targets, and all associated files, when importing the project to their translation tool (e.g., Lingo).
-
From the Languages drop-down, select the language(s) to translate your project to.
-
(Optional) Enter Notes/Description for the translation branch.
-
(Required for MadTranslations, Optional for Manual) Select Create a language skin for the target language. When selected, the translator will know to translate the language skin file that you want to display as the interface for online output. If this is not selected, the output for the interface will display with its default values for the language.
-
-
Click Next.
-
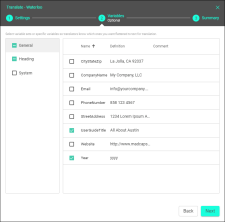
(Optional) In the Variables screen, select variables (i.e., variable sets or specific variables) so translators know which ones you want flattened. Click Next.
To be clear, Central is not flattening variables. In this screen, you are just selecting variables or variable sets to alert your translator that you want them flattened during the translation process. Flattening a variable converts it to text. If you flatten a variable, it is no longer a variable. When you get the translated project back, it will just be text in the topic. If you do not flatten a variable it will appear as tags to the translator.
You might use this feature if a variable definition has different meanings in the translation language, depending on the context. If variables are not flattened, the translator can only translate the variable with a single term, and it is used everywhere that the variable is inserted. If variables are flattened, the translator can translate each term separately.
-
Click Next.
-
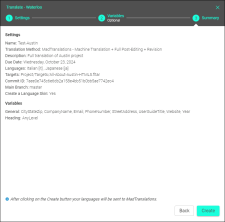
In the Summary screen, review your settings and variables. If you need to adjust anything, click Back to revisit previous screens.
-
Click Create. When completed, view the Projects > Translations page.
Note If you select a translation package or branch row in the grid, that enables toolbar options. Options are also in the vertical three-dot menu. One option found in the context menu but not in the toolbar is View Profile. This opens the Profile dialog where you can see branch information, do minor edits, and click to jump to other Central pages.
Note Language abbreviations are hard coded in front of the name. For example, if you enter the name My-Translation, and select French as the language to translate to, the branch name becomes "lang/fr/My-Translation." With multiple languages, multiple branches are created. For example, if you select French and German, the branches created are "lang/fr/My-Translation" and "lang/de/My-Translation." The naming allows for easier identification, and because these are branches, you can go into Projects > Files, and see the translation branches along with other project branches.
What’s Next?
Depending on your preferred Translation Method, the process for sending a branch out for translation, and receiving it back is different.
-
MadTranslations (Automatic Process) Once you create a translation branch using the wizard, your project information is sent to MadTranslations automatically. They will send you a pricing quote, and upon your approval the translation begins. When complete, the translated branch is automatically delivered to Central (overwriting the existing translation branch) and you will see its updated status in the grid.
-
Third-Party (Manual Process) If you are using the Manual translation method, you need to initiate the process in order to get the files to your translator. You can do this from the grid once the translation branch is created and displays there.

