Sending and Receiving a Translation Branch
Depending on your preferred Translation Method, the process for sending a branch out for translation, and receiving it back is different.
-
MadTranslations (Automatic Process) Once you create a translation branch using the wizard, your project information is sent to MadTranslations automatically. They will send you a pricing quote, and upon your approval the translation begins. When complete, the translated branch is automatically delivered to Central (overwriting the existing translation branch) and you will see its updated status in the grid.
-
Third-Party (Manual Process) If you are using the Manual translation method, you need to initiate the process in order to get the files to your translator. You can do this from the grid once the translation branch is created and displays there.
[Menu Proxy — Headings — Online — Depth3 ]
Permission Required?
Translation is an activity available to users with the Author status. You must have the following permission setting in Central:
![]()
For more information about permissions, see Setting User Permissions or Setting Team Permissions.
How to Manually Send a Translation Branch to a Third-Party
- On the left side of the interface, click Projects.
-
Select a project in the grid to open it.
-
At the top of the interface, click Translations. The Translations page displays.
-
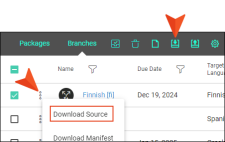
From the Packages tab or Branches tab, click the check box next to the package or branch you want to send.
-
From the toolbar, select
 . This creates a copy of the language branch and downloads it to your local PC as a ZIP file.
 Alternatively, you can click the vertical three-dot menu and select Download Source.
-
Send the ZIP file to your translator. You can send the ZIP file via email, FTP, or whatever other way works between you and your translator. Be aware that there might be a file size limit for an email attachment.
Alternatively, you could pay for another seat on your license for the translator to interact directly with Central.
Note Download Source Flare Project (.zip) is intended for clients using the Manual translation method. However, it is available if you are using the MadTranslations method; only to use in an unlikely event that would require you to manually send it to MadTranslations.
How to Manually Receive a Translated Branch From a Third-Party
Your translator should communicate with you when the translated branch is complete.
- On the left side of the interface, click Projects.
-
Select a project in the grid to open it.
-
At the top of the interface, click Translations. The Translations page displays.
-
From the Branches tab, click the check box next to the branch you want to upload.
-
From the toolbar, select
 . In the dialog, navigate to and select the received translated project.
 Alternatively, you can click the vertical three-dot menu and select Upload.
The translated branch is uploaded back into Central (replacing existing files).
What’s Noteworthy?
Tip After you download the source project, you might notice a long string of characters appended to the project folder name. You or the translator can rename the folder or the ZIP file name to something shorter, or to anything that makes sense to you.
![]()
The only files that need to stay the same in the translated project are the project name (<name>.flprj) and the file names within the project.
Note The status of your project is not automatically updated in the grid if you are using the Manual translation method.
What’s Next?
You can generate single language output (i.e., one target is generated for each language) or multilingual output (i.e., one target is generated for multiple languages). To generate a single language output see Generating and Scheduling Builds. To generate multilingual output see Generating Translated Output.

