Editing Target Settings


Note Only the most common target options are available in Central. For all of the additional target options—and to add or edit targets for the other output types not supported in Central—you need to use Flare.
You can edit settings for supported targets in content or code view. Anyone who has used the Target Editor in Flare knows that there are dozens of settings available for power users. In Central, only the most common target settings are available for these two output types.
Note At this time, you cannot edit other target types (e.g., Word) in the content view. However, you can open and edit them in code view. Otherwise, you can use Flare to edit the settings for those targets.
[Menu Proxy — Headings — Online — Depth3 ]
Permission Required?
Editing content and project files is an activity available to users with the Author status. By default, users with Author status have the following permissions set:
-

If this is deselected, then viewing files in a read-only mode is allowed. On the left side of the page, the Files vertical three-dot menu is not available.
-

If this is deselected, the XHTML in the Code view is read-only.
Editing code is regarded as a capability for an advanced user. If not done properly, the code can become malformed quickly. Administrators can prevent users from editing the code by deselecting the Edit Code permission.
For more information about permissions, see Setting User Permissions or Setting Team Permissions.
How to Edit Target Settings
-
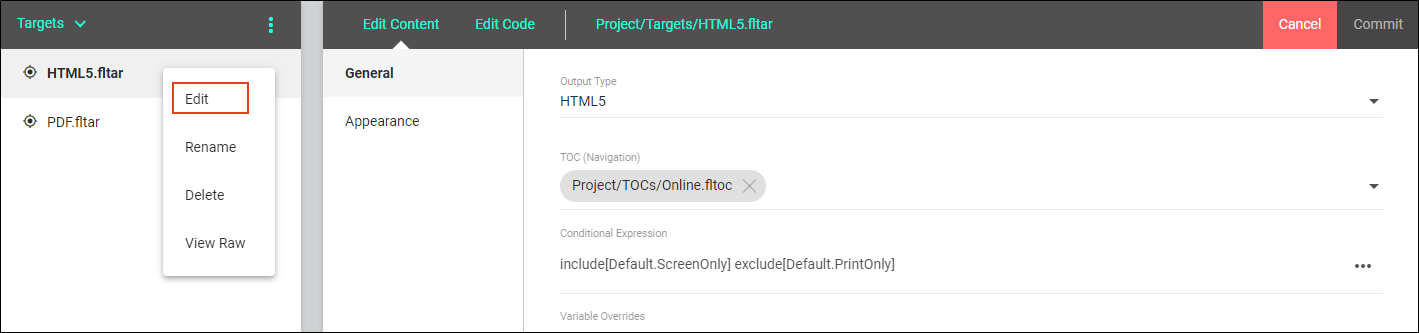
From the Projects page (Files tab), open a target and in the upper-right click Edit.
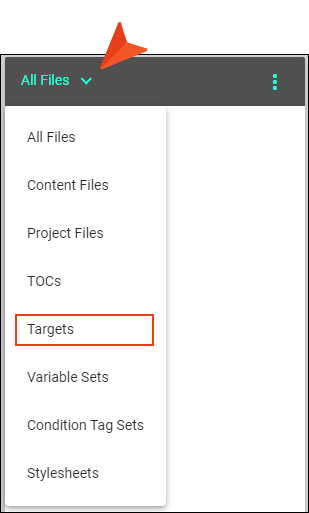
Tip Click the All Files drop-down, and select Targets. This filters only the target files to display in the files panel.

Tip From the left side of the page, you can right-click to select and open a target directly in editing mode. From this menu, you can also rename, delete, or view raw (i.e., opens the file code in a browser).

-
Set any of the General or Appearance options. In the case of PDF and PowerPoint targets, you can also set PDF Options and PowerPoint Options, respectively.
GENERAL
-
Output Type You can use the Target Editor to switch the output type for a particular target—HTML5, PDF, Clean XHTML, or PowerPoint. The options in the editor automatically change to reflect your choice.
-
Comment You can add an internal comment to describe the output.
-
TOC (Navigation) For HTML5 and Clean XHTML, this connects a particular table of contents (TOC) file with the target; the selected TOC provides the navigation for the output. For PDF and PowerPoint, the selected TOC file functions more as an outline (i.e., it controls the order of the topics for the output). See Associating a TOC With a Target.
-
Conditional Expression This lets you control which content is included in or excluded from the output, based on the condition(s) applied to it. See Associating Conditions With Targets.
-
Variable Overrides This lets you provide alternate definitions of variables for the target in question. See Overriding Variable Definitions in Targets.
-
Content to Include (HTML5 and Clean XHTML targets only) This is a quick way to include or exclude certain content from the output, based on whether that content is linked to the target or associated TOC. See Including Specifically Linked Content.
-
Startup Topic (HTML5 and Clean XHTML targets only) This determines the topic (usually a "Home" topic) that users first see when opening the online output. See Specifying the Startup Topic in a Target.
-
Output File This lets you provide a specific name for the main output file (in the case of HTML5, it is the main entry file; in the case of PDF, it is the name of that PDF; for PowerPoint, it is the name of the PPTX output file). See Specifying the Output File Name in a Target.
-
Analytics Key (HTML5 targets only) This lets you choose a specific analytics key for the target so that you can monitor how end users are interacting with that online output. See Associating Analytics Keys With Targets.
-
Include CSH ID meta tag (Clean XHTML targets only) When this option is enabled, the topics in the generated output will include the identifiers from the linked alias file as meta tag content. This option is required when Use CSH identifiers is selected in the URL Naming field of the Salesforce® Destination Editor.
-
Include TOC Path meta tag (Clean XHTML targets only) When this option is enabled, the topics in the generated output will include the TOC path as meta tag content. This option is required when one of the TOC mapping options is selected in the Category Mapping field of the Salesforce® Destination Editor.
Appearance
-
Branding Stylesheet This lets you select a particular branding stylesheet for the target, which quickly adjusts the basic color scheme, font, and branding images for the output. See Associating a Branding Stylesheet at the Target Level.
-
Stylesheet This lets you select the main stylesheet for the target, which controls the overall look and feel for content in the output. See Associating a Regular Stylesheet With a Target.
-
Template Page (HTML5 and Clean XHTML targets only) This determines which template page is used for topics, thereby applying certain content or elements (e.g., toolbars, copyright text) to each page in the output. See Associating Template Pages With Targets.
-
Page Layout (PDF and PowerPoint targets only) This determines which page layout is applied to the target. For PDF, it provides repeated content (e.g., headers, footers, page numbers), as well as page structure (e.g., orientation, size, margins) to each page of the output. See Associating Page Layouts With Targets.
-
Skin (HTML5 targets only) The lets you choose a skin for the target, controlling the look of the navigational elements surrounding the online output. See Associating Skins With Targets.
-
Powered by MadCap (HTML5 targets only) This lets you disable the "Powered by MadCap Software" links that can appear at the bottom of topics in online output. See Disabling "Powered by MadCap Software" Backlinks.
-
Convert stylesheet styles to inline styles (Clean XHTML targets only) For Clean XHTML targets, you have the option to keep your stylesheet styles or to convert them to inline styles. If you choose this option, the output folder will not include stylesheet files. That’s because the styles have been integrated into the topic files.
PDF Options
There are several options specific to PDF targets that you can use to control the document properties, copyright information, initial view, and tagging for the output. See Specifying PDF Options.
PowerPoint Options
There are several options specific to PowerPoint targets. This includes metadata such as the document title, author, subject, keywords, etc. In the PowerPoint application, you can view the document properties information in File > Properties.
-
-
Click Commit. (Or click Cancel, to back out of the process.)
-
In the Create New Commit dialog, enter a Commit Message.
-
Click Commit.